
“This whole episode could have been avoided if I’d stuck to my rule of not experimenting. I broke it, I paid the price and then the dominoes fell as I tried to catch up with the deadline”
I have been a professional modelmaker and journalist for over 25 years and during that time, I’ve had to hit very tight deadlines, end points set either by customers for whom I’m building models, or the release dates set by the two publishers that I’ve written and edited magazines for. That being so, I’ve spent what seems like a lifetime setting the following rule in stone:
“Never experiment with a new product or technique whilst the clock is ticking. Ever.”
It’s a simple rule that has served me well…Until this weekend when I forgot all about it and then paid the price. Twice.
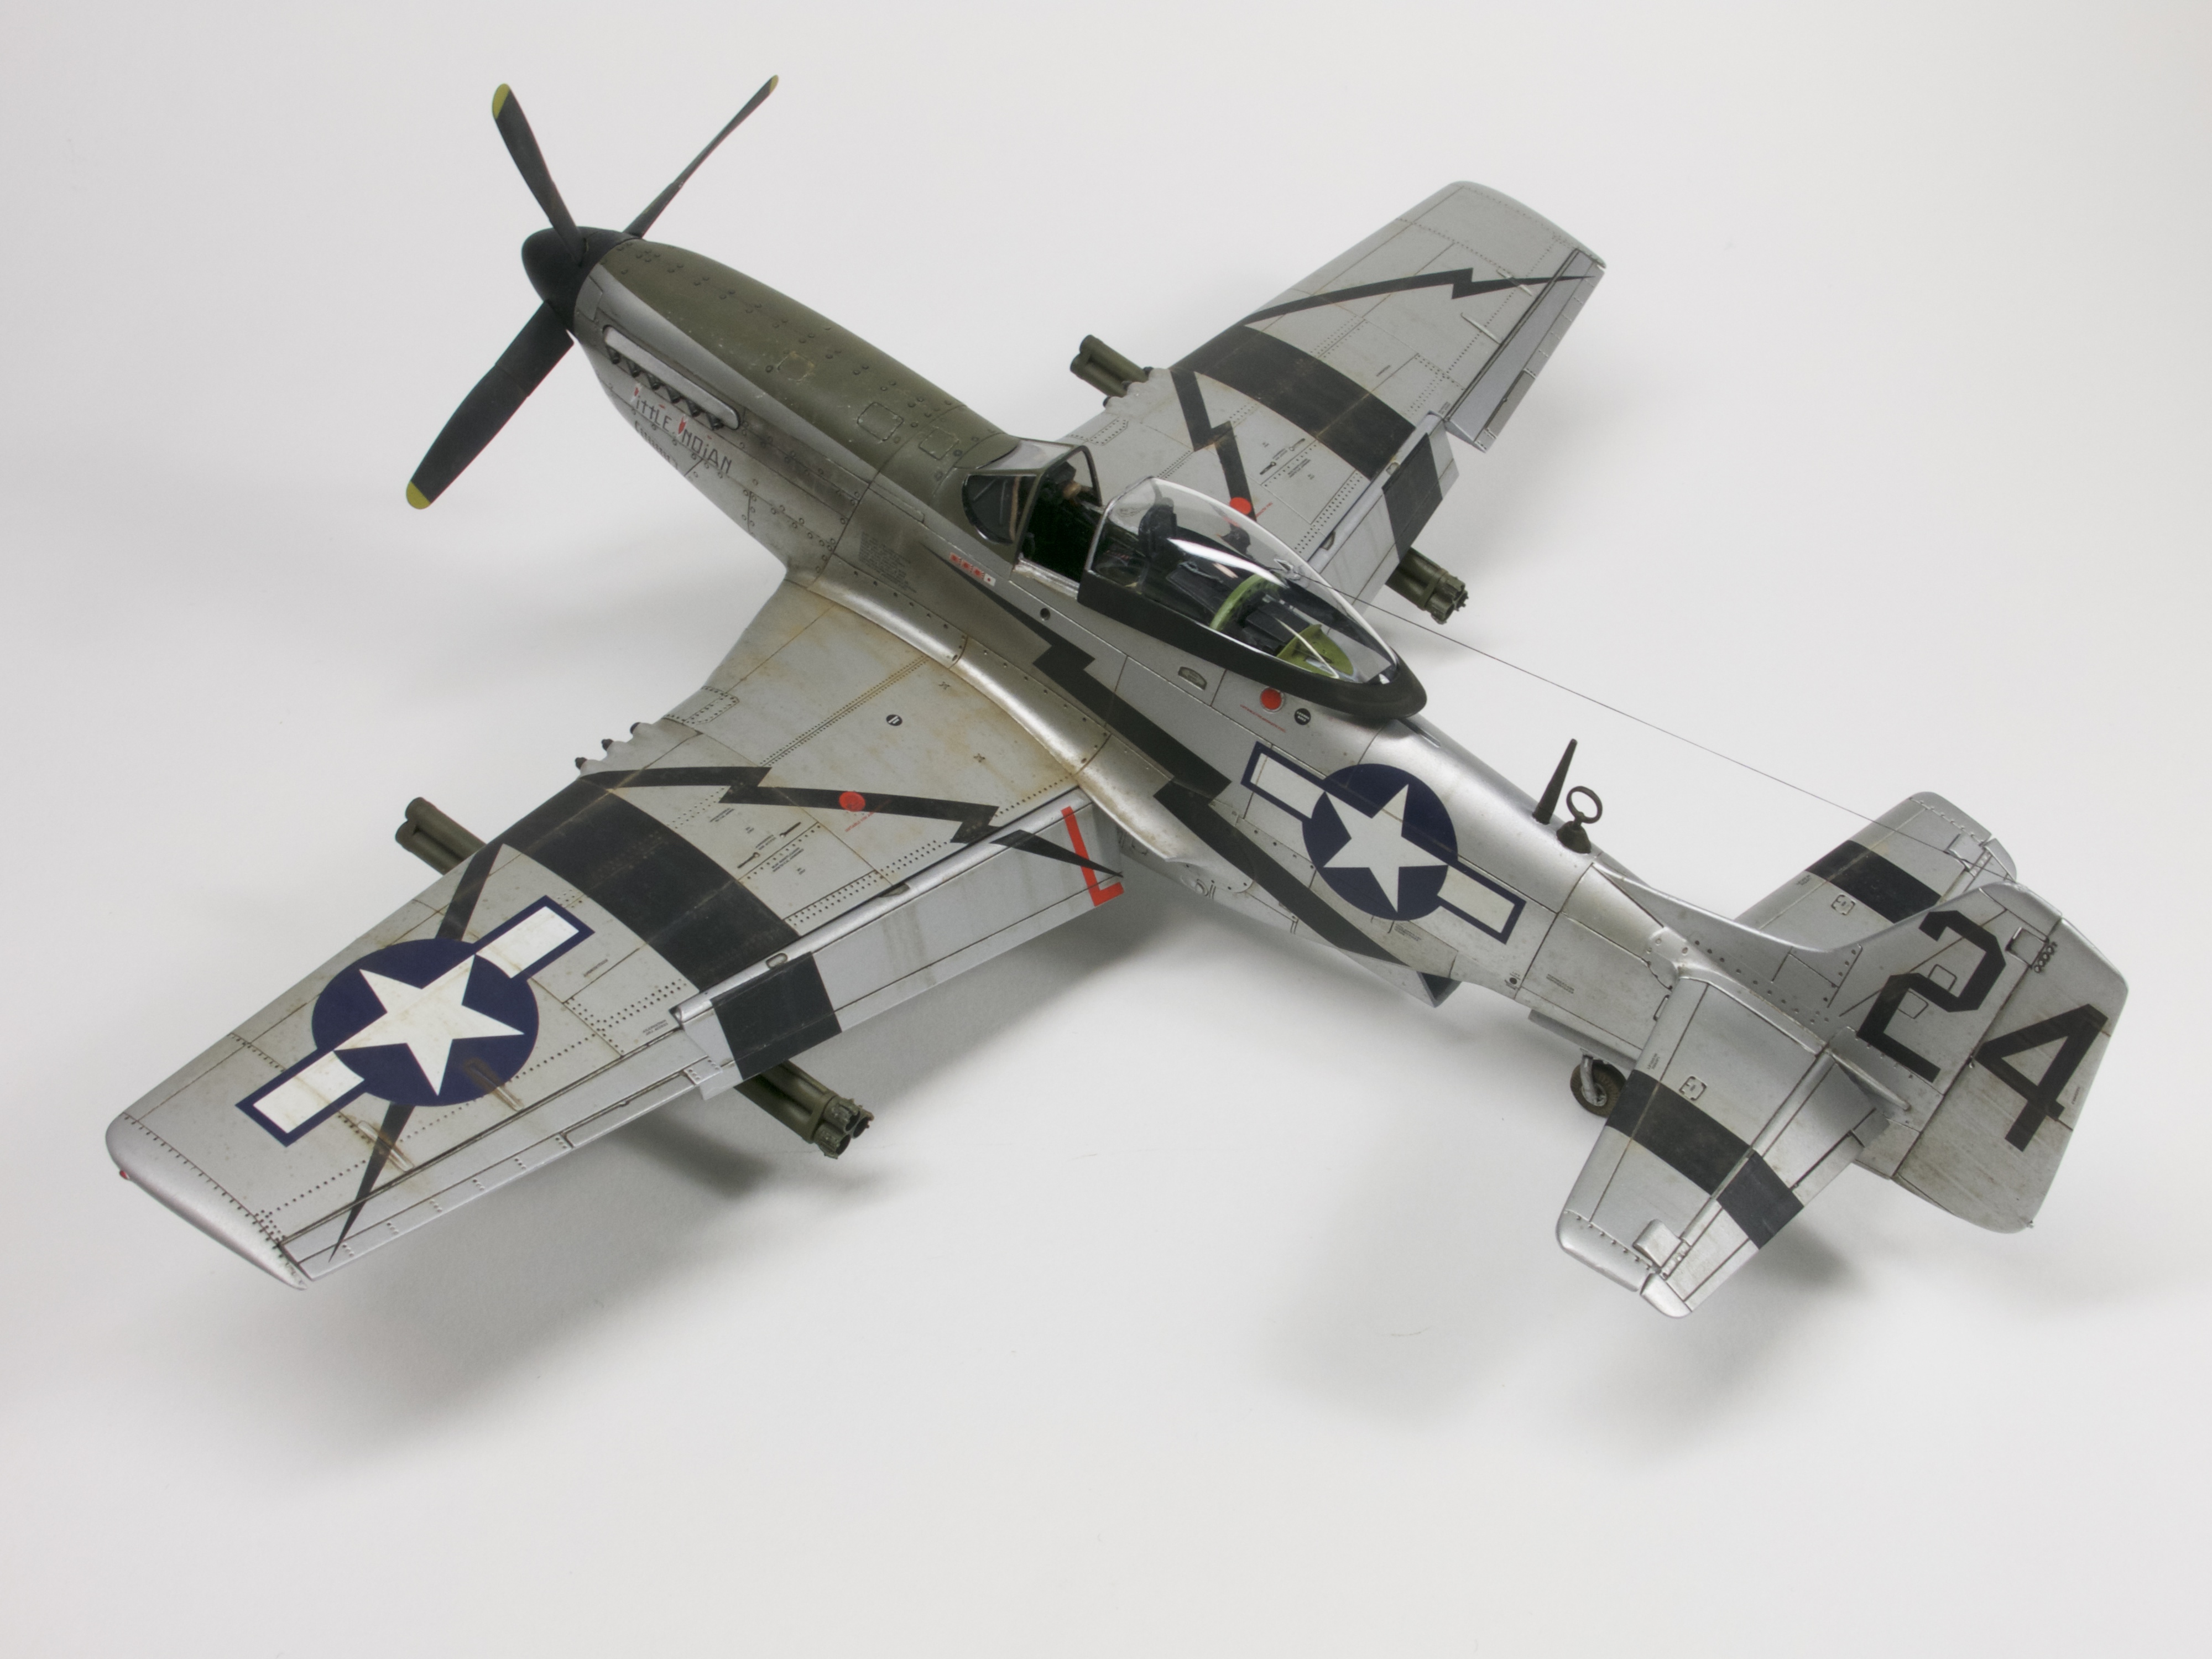
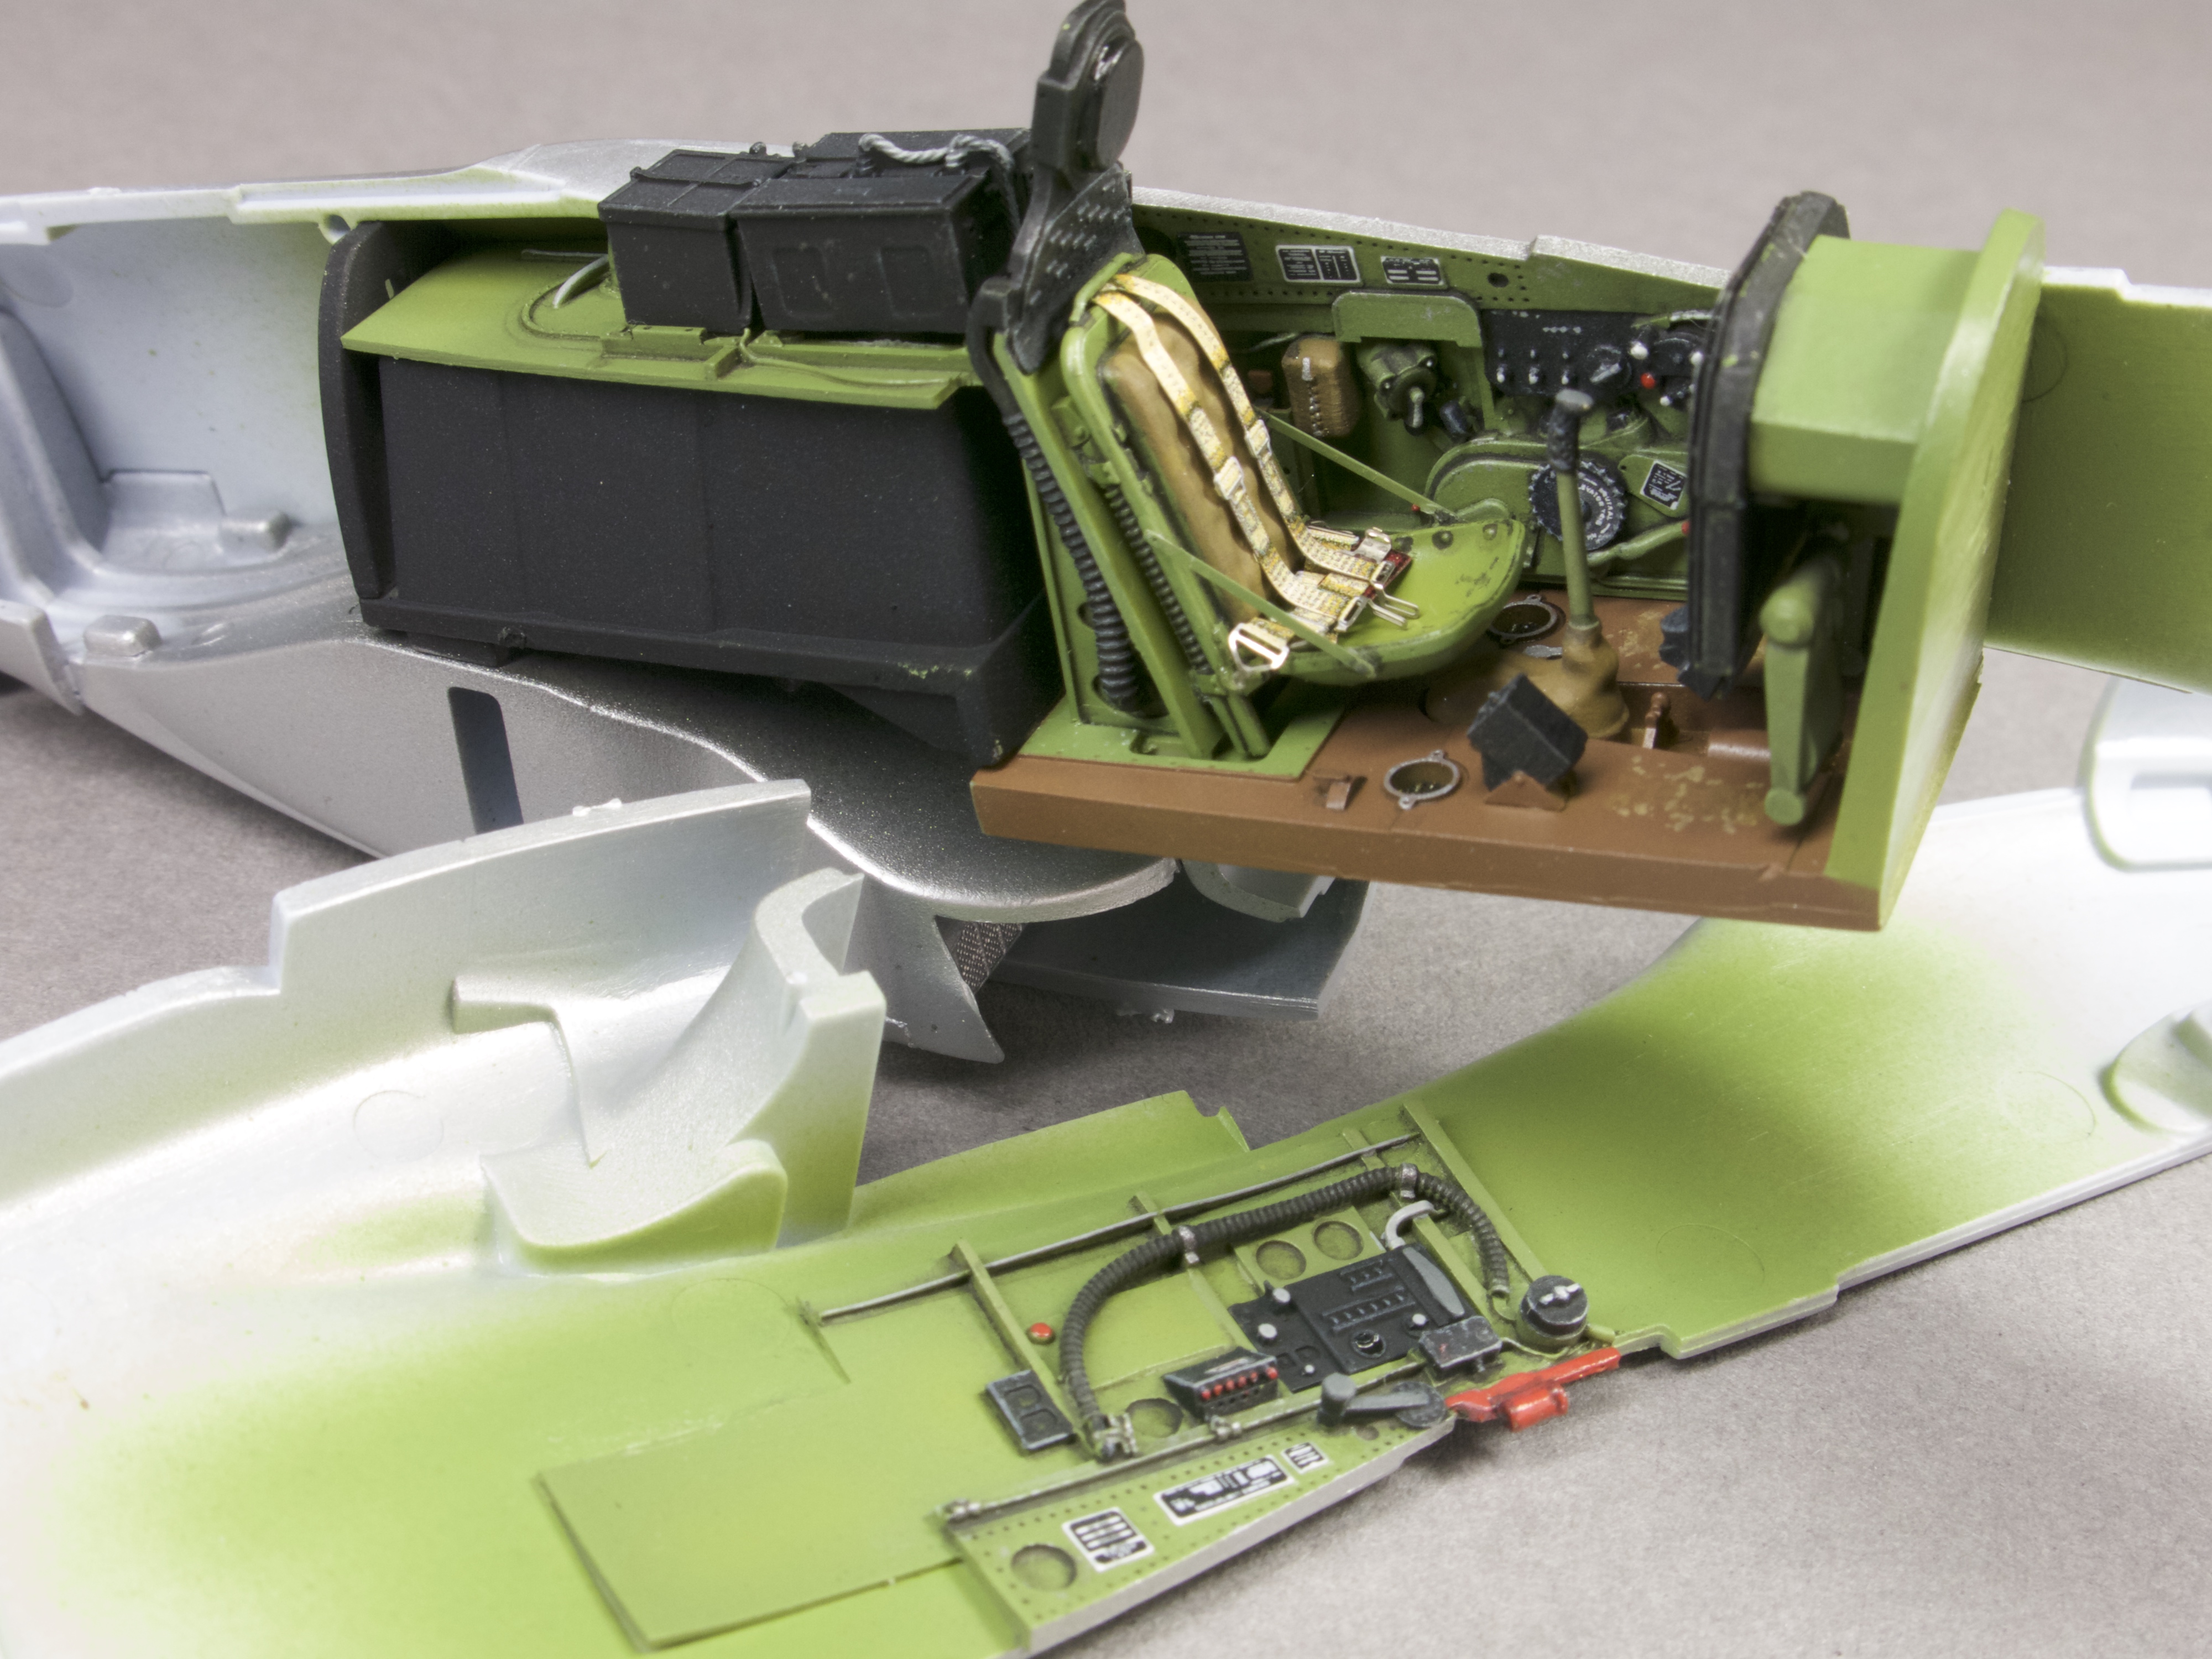
It was all going so well. I was almost at the end of a review build of the new Airfix 1:48 P-51D Mustang, a kit that I was not only building for a feature in Model Airplane International from the parts supplied in the box, but also incorporating plenty of Eduard’s goodies, aftermarket gems that would elevate the otherwise neat levels of detail in the kit to far greater heights. The model was built, painted and decalled and then it all went south in a spectacular and frankly, quite public manner…
Many of you reading this will know how I paint my natural metal finishes and will have seen videos explaining how I use Tamiya AS-12 Natural Metal as a basecoat, overspraying panels with Gunze Sangyo Super Metallics to add definition and the impression of tonal and patinal shifts, across the surface of the model. Well, this model was no different. You’ll also know that I like to keep those patinas in place, so tend to add flatter areas of colour last, carefully masking over the surface of the model to then block-in what’s needed. It’s a system that has served me well over the years with nothing in the way of mishaps or missteps, befalling my journeys through this tricky aspect of our hobby.
And so I began with the completion of my Mustang. This time though there was a change: I incorporated Frog masking tape into the process to protect the larger areas of colour, rather than Tamiya’s tape. And that’s where the problems began. You remember that my rule is never to use unknown products when working towards a deadline? You remember that, right? Frog tape was unknown, never used before, a product that had no history on my workbench. Essentially, it was leap into the modelling unknown. It was never going to end well.
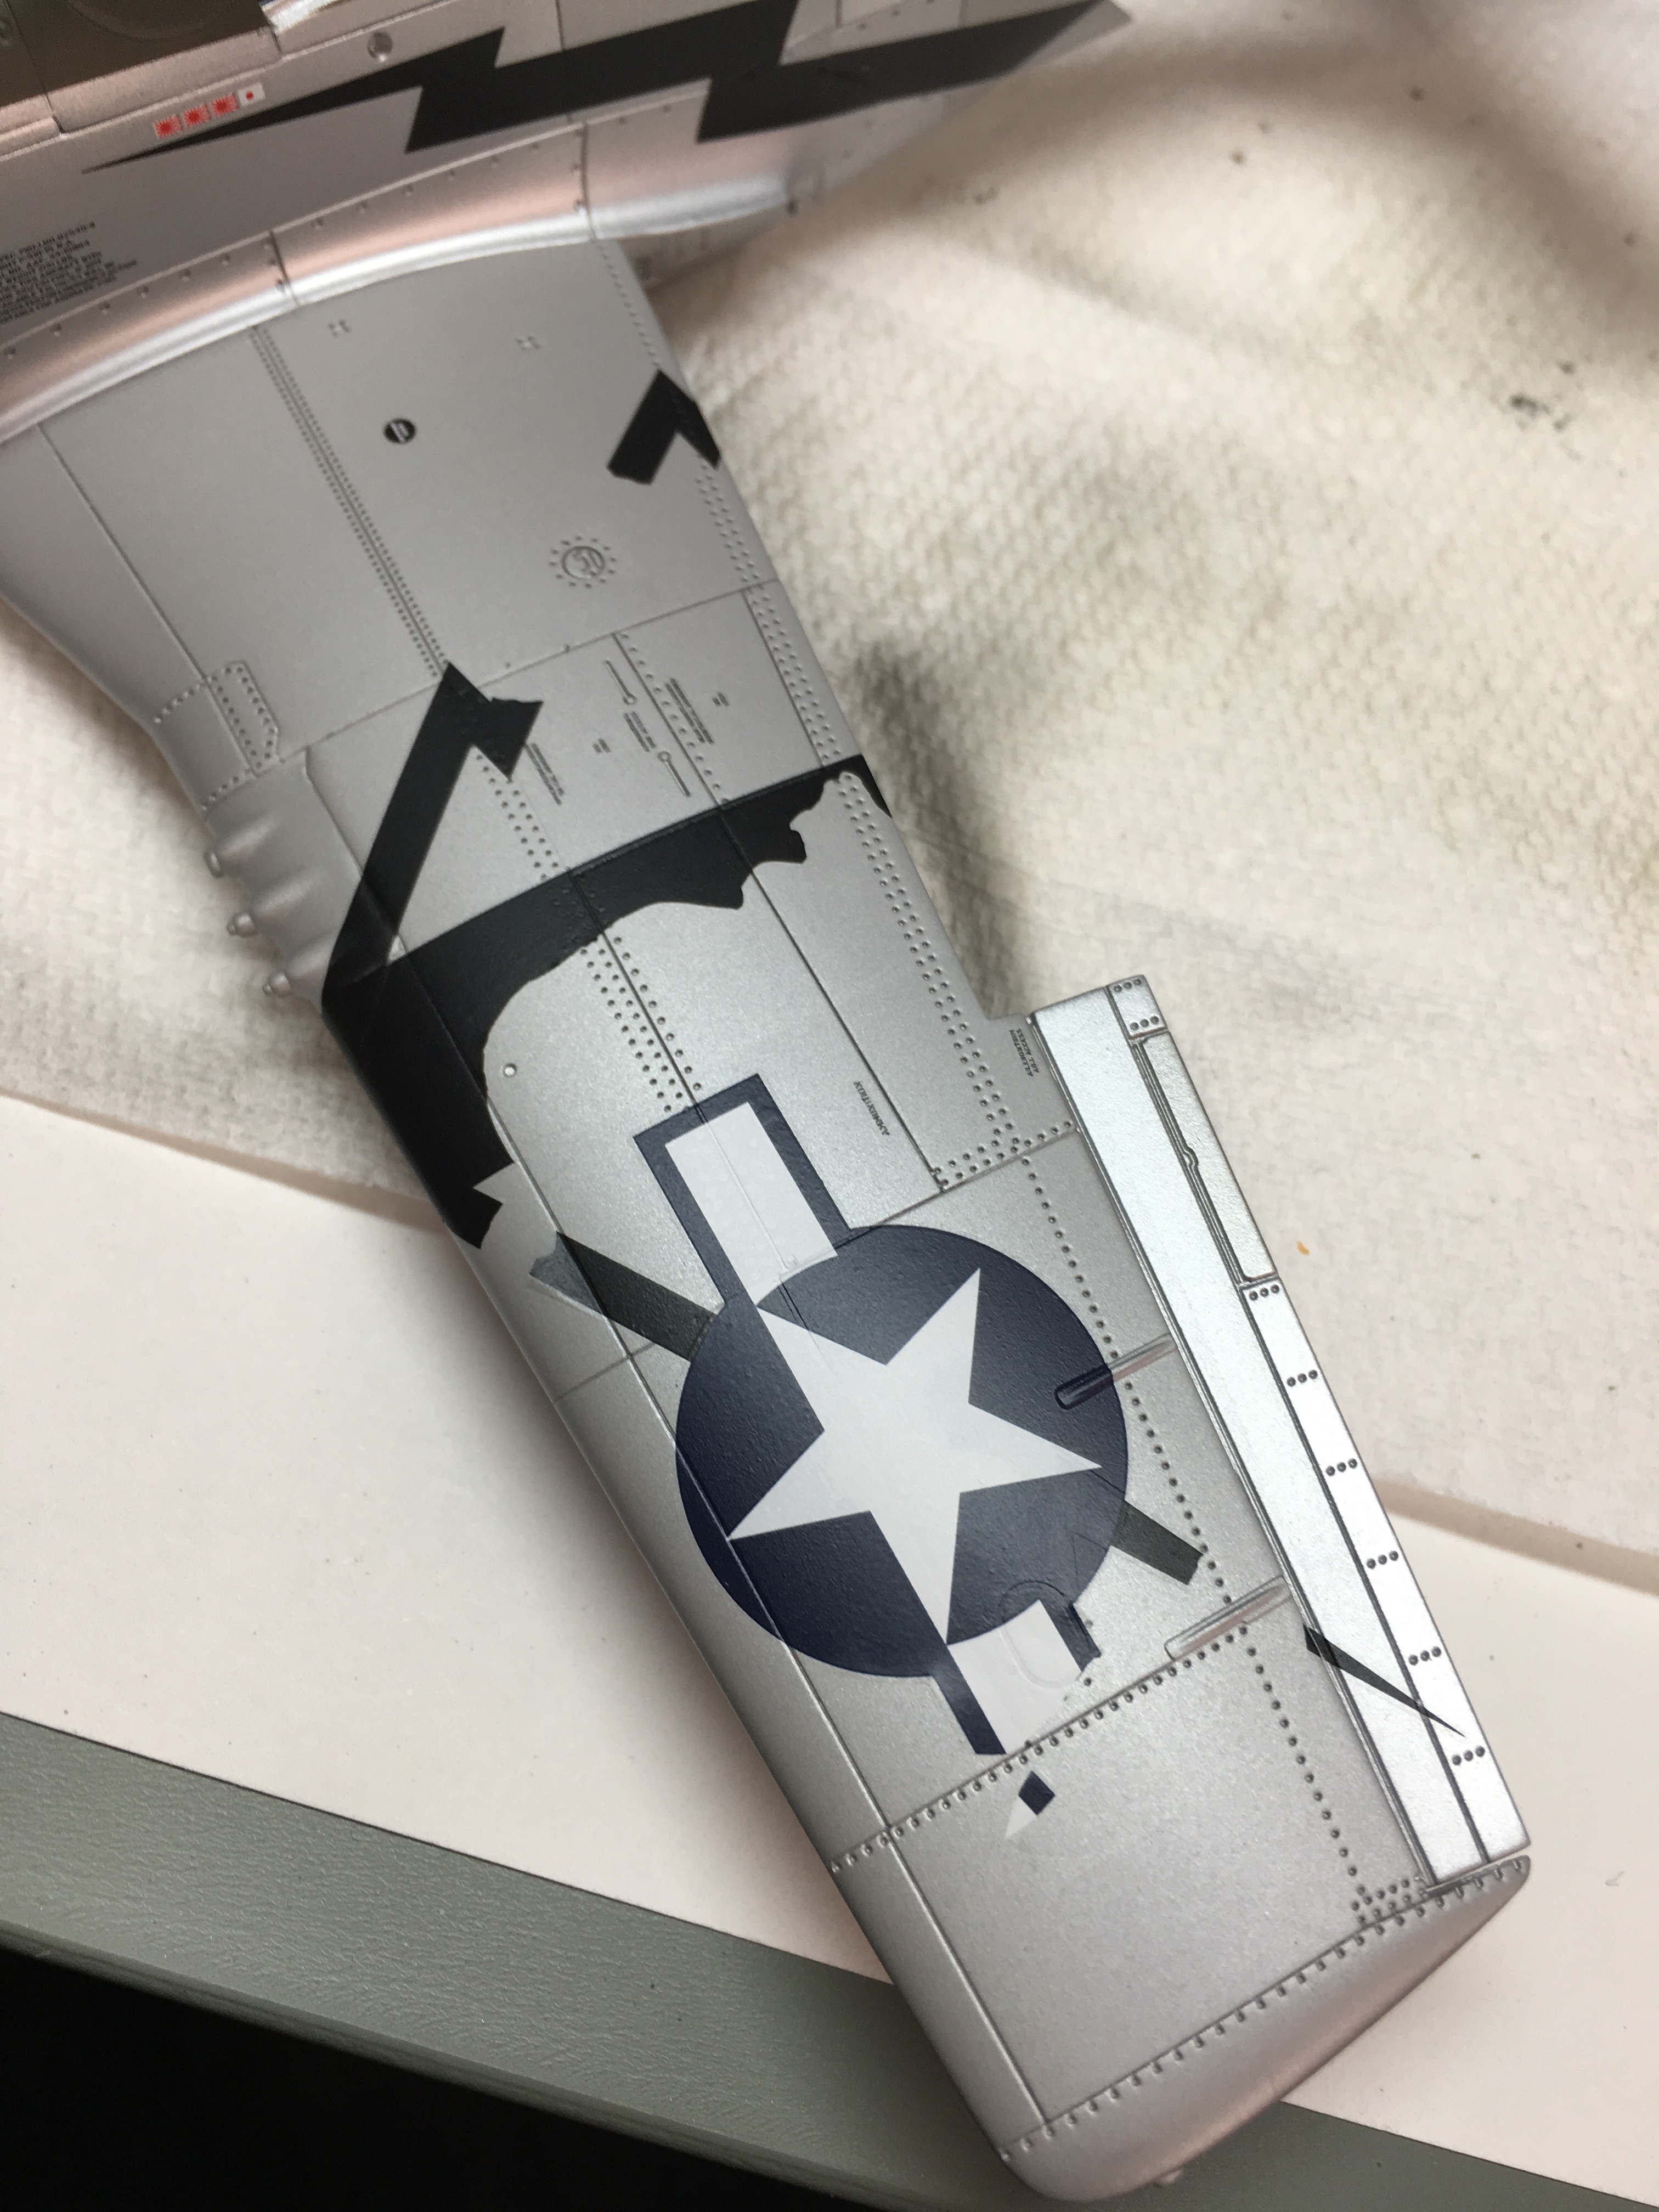
After masking off the anti-glare panel it was airbrushed with Olive Drab and left to dry whilst I made a coffee before the masking could be removed…along with all of the decals on the upper, left-hand wing, left-hand nose and the rear of the right-hand fuselage. I’m not talking small chunks, I mean almost everything. The whole lot. All of the markings, gone, no longer there, stripped back to the underlying paint. It was as though they’d never been there in the first place! The Frog tape that seemed low-tack, had despite repeated visits to my arm to further remove its adhesive qualities, stuck to the model like mud to a wet dog and now it was doing its best to stay put. I’m just grateful that it was only the decals that came away!
At this point, fighting back tears of rage, I had to decide what to do. Head spinning, my deadline for completing the model night was now flying out of the window (accompanied by my patience and enthusiasm for a build that up to that point had pretty much run on rails) and so I had to decide what to do next. Strip it? Repaint it? Smash it with a hammer..?
Having calmed down following a ten-minute power nap, I decided that the best thing I could do was to visit my Amazon account and order a new kit so that I could replace the decals that were now intimately entwined with the orange masking tape that was haphazardly decorating the floor of my studio. Checking the paintwork, it appeared that the underlying surface of the model where the decals had been so lovingly applied was still smooth and thanks to an overlying layer of satin varnish, their locations could be seen as subtle ghosts on the surface of the paint. All I had to do was order the kit, then reapply the decals, blend them back in and then complete the model. Job done. Easy eh?
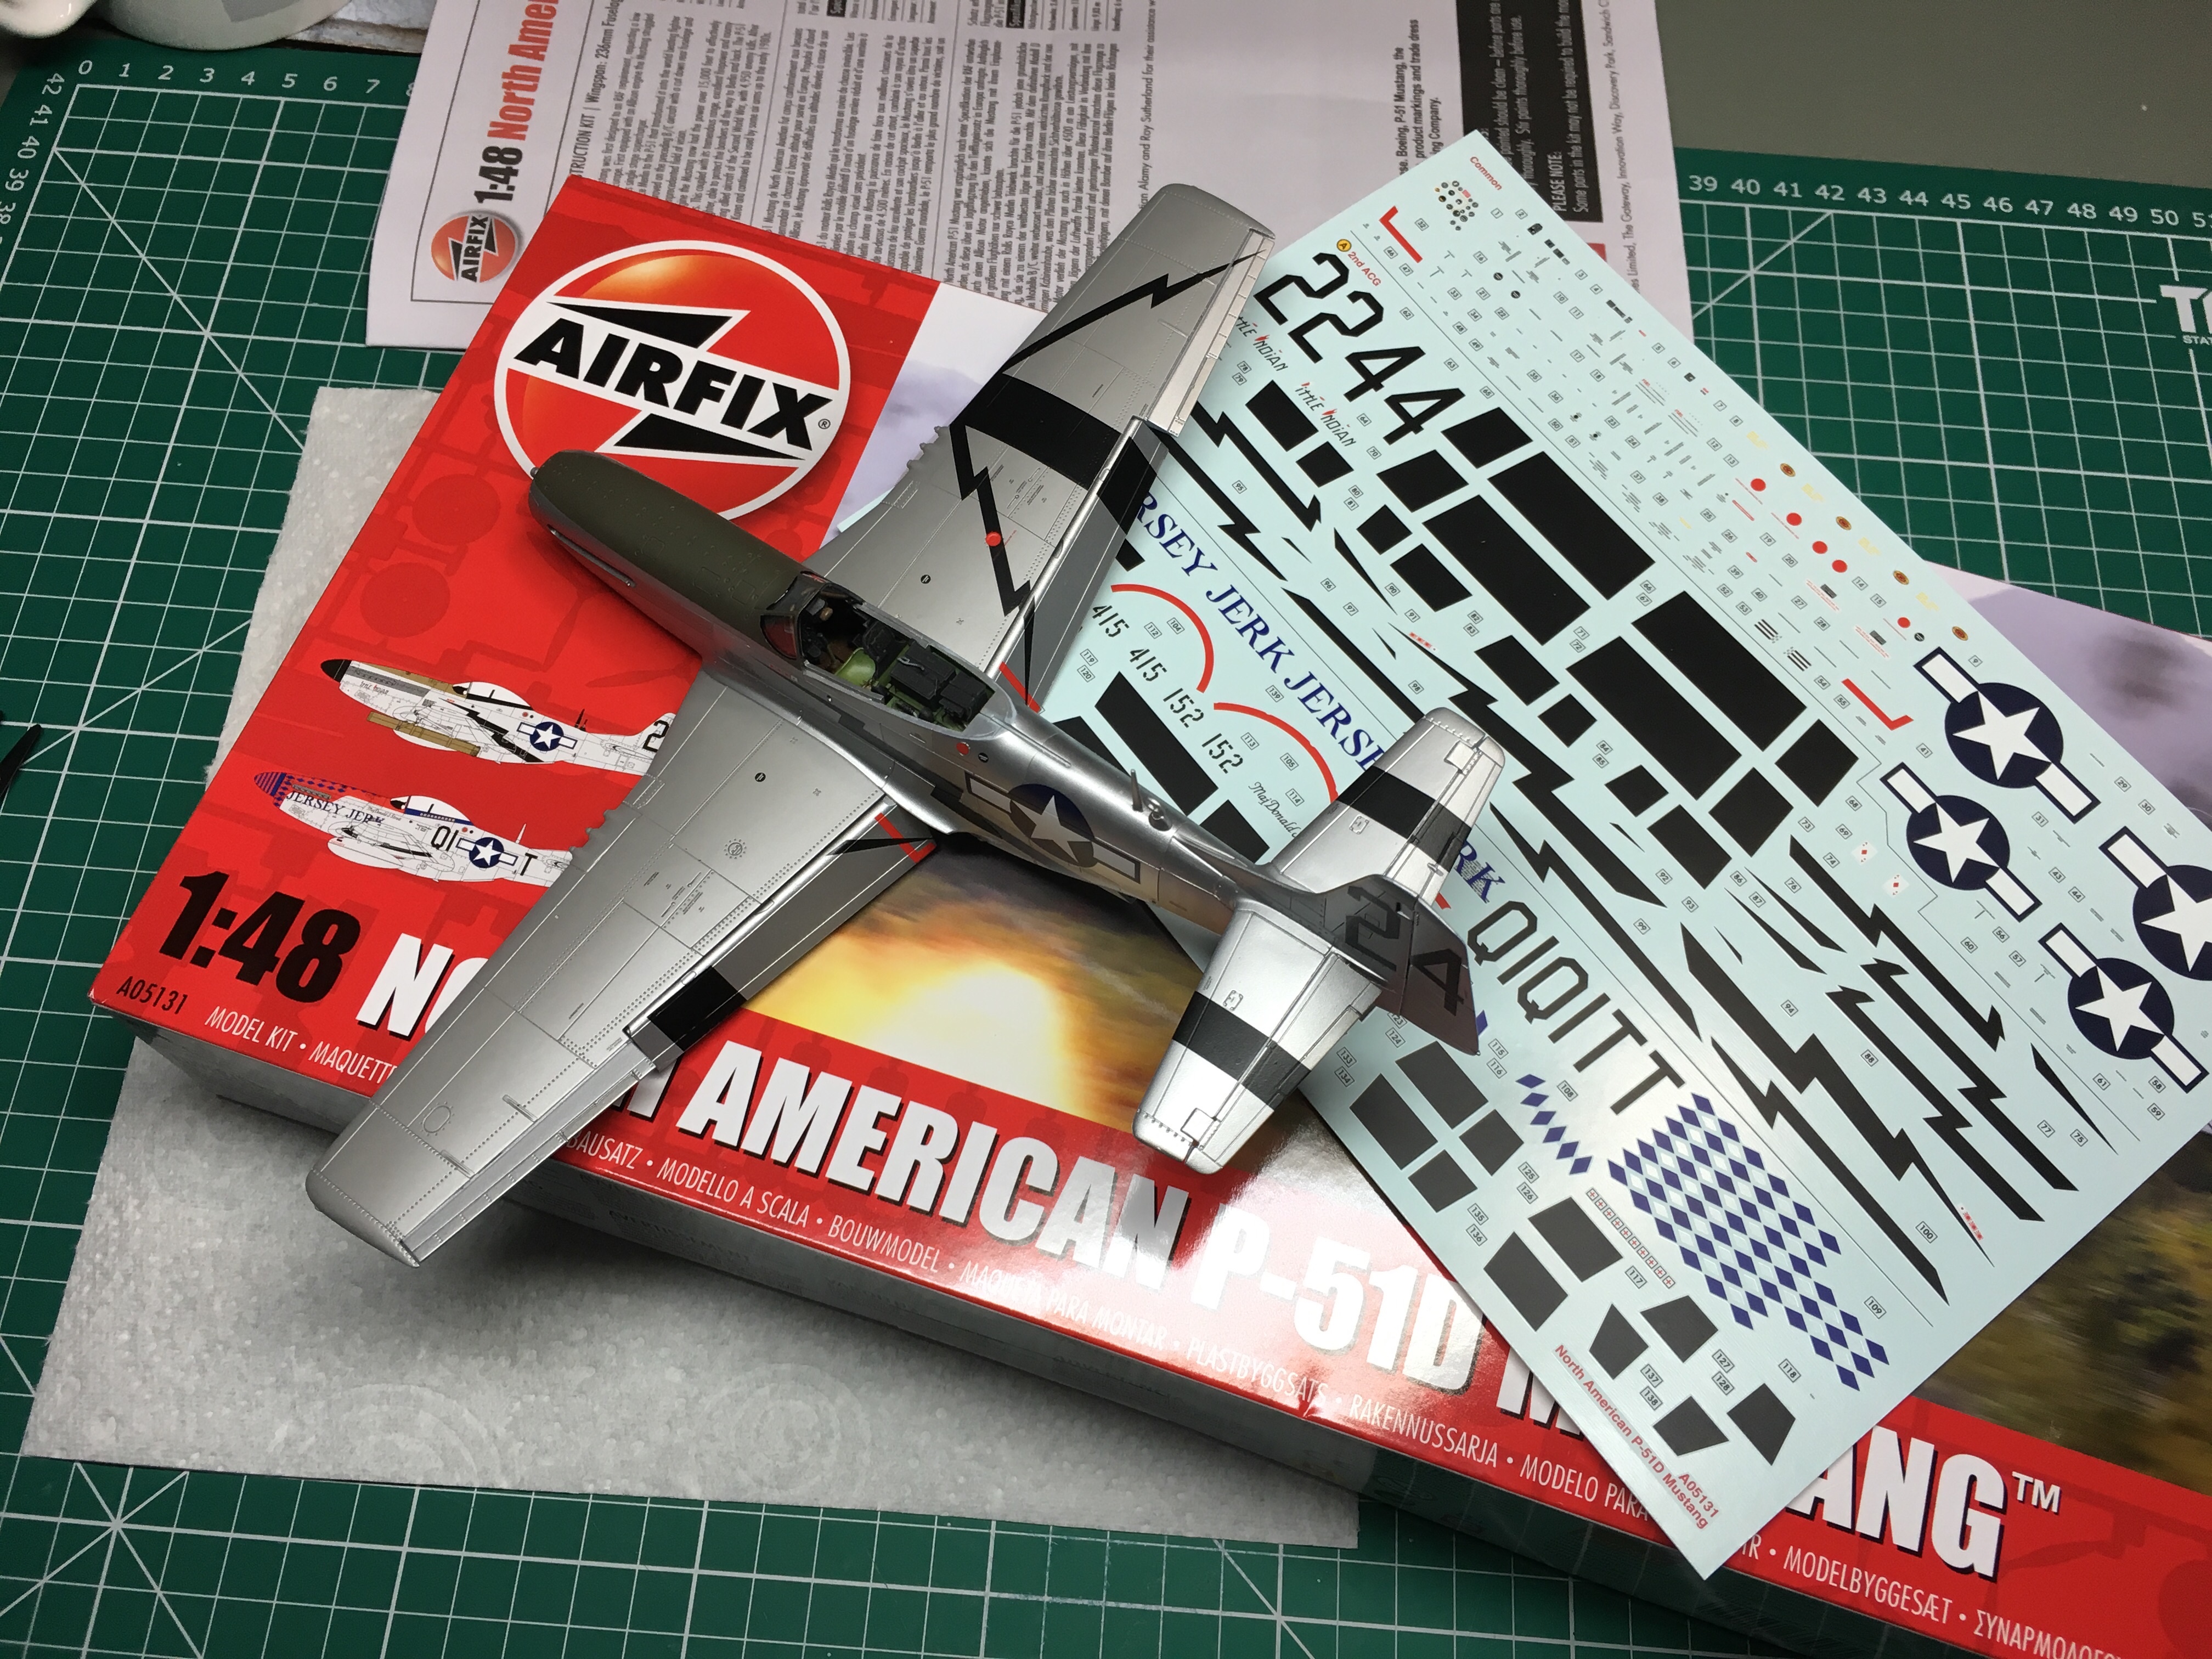
So I ordered the kit and then waited for it to arrive (this was Friday afternoon and I had next-day delivery), an arrival that included me telling the courier that he needed to drop it into our recycling bin because we had arranged to meet friends for coffee and might not be in when he arrived (the idea of the recycling bin not being lost on me as I had considered recycling it into its constituent parts, not 18 hours earlier…). The following day the kit turned up as advertised and I set to work…once I’d made another coffee.
The process was actually very easy and the joints between the new decals and those that had been initially applied, very difficult to see. Happy that everything had settled down, the weathering was reinstated, sub-assemblies joined and then the model completed and photographed ready for its debut on the various Internet sites that I use to reveal such things. It was duly posted. And then the message came in, “Spence, is the upper wing marking the wrong way around?”. “What?!”. Oh no, it is – or words to that effect, after all, this is a family show.
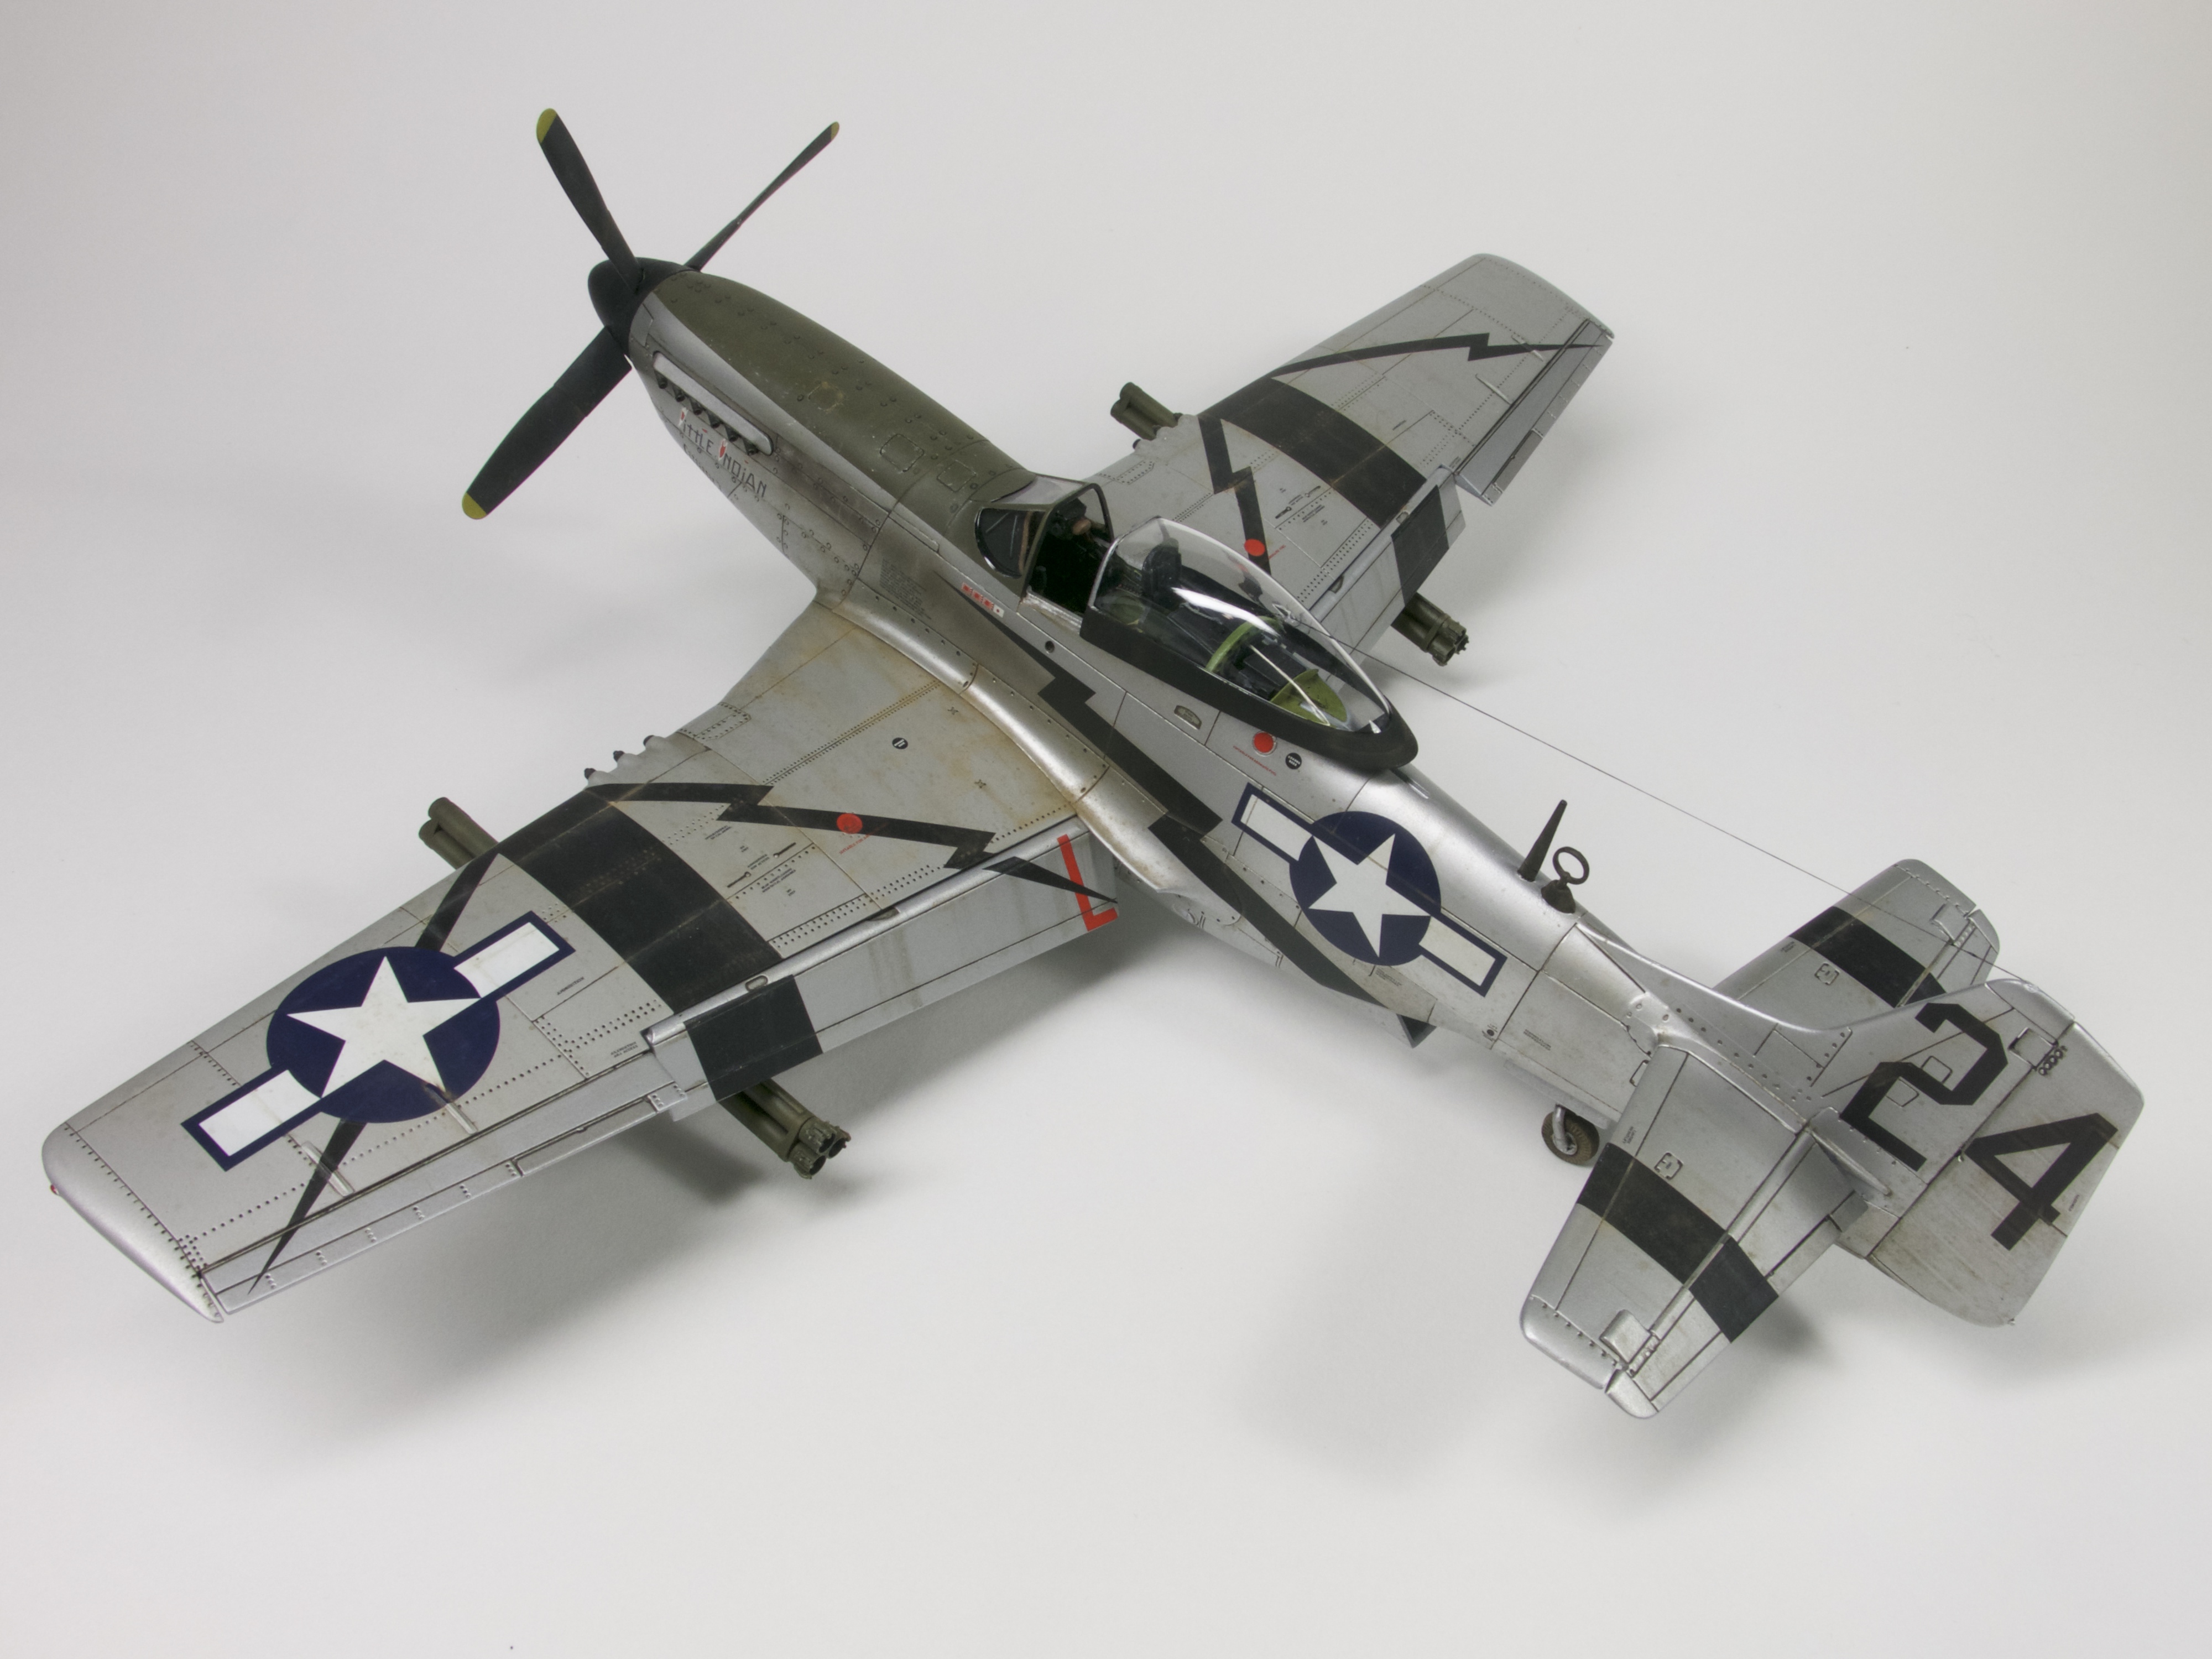
In my haste to get the model finished and despite looking at it for the thick end of 12 hours, I had not noticed that the star and bar marking was pointing in the wrong direction (even now as I type this, I find it hard to believe that something that obvious passed me by, but it did) and so once again, the marking had to be removed, reapplied and then blended in. To say that I was unhappy was an understatement. So, using the same Frog tape as before (live and learn, eh?!) I remove the decal and used another spare from the Airfix kit to correct the error so that once again I could photograph it and then edit all of my posts that showed the model with its now somewhat obvious and less-than-intentional, mistake.
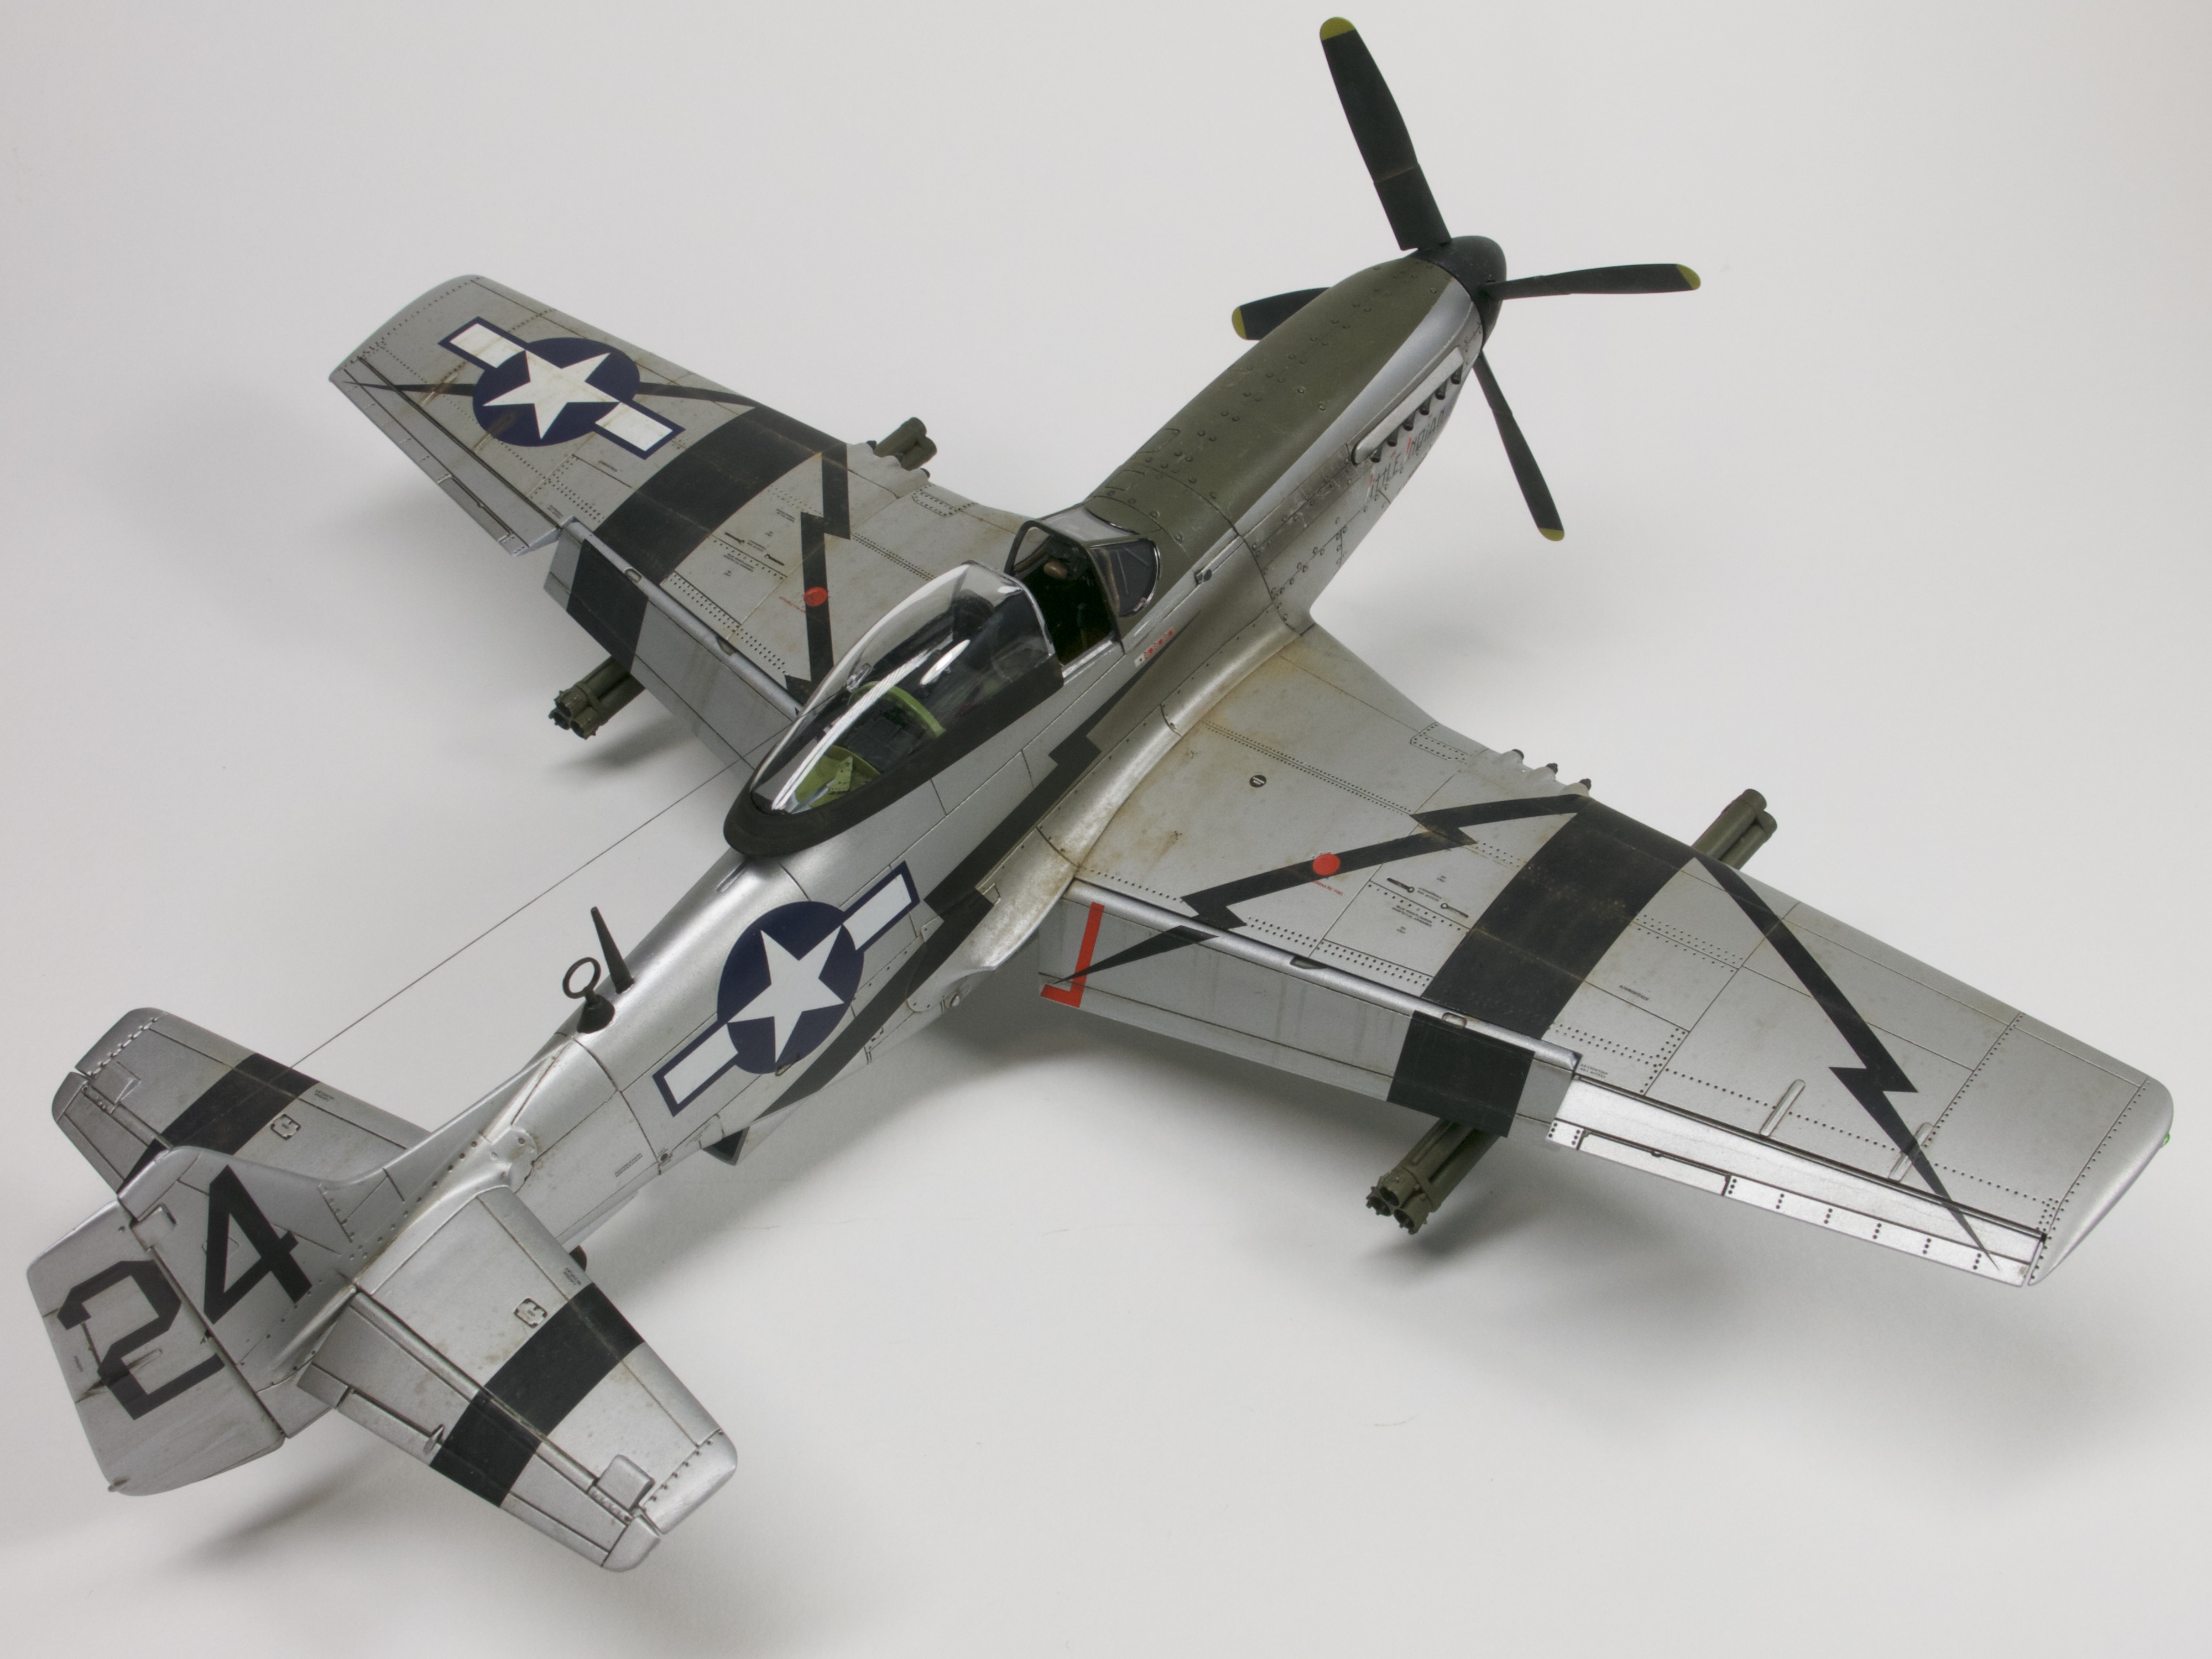
This whole episode could have been avoided if I’d stuck to my rule of not experimenting. I broke it, I paid the price and then the dominoes fell as I tried to catch up with the deadline that was still not too far out of reach. In the process, I gave up on a game of football and then found myself working over a weekend when I wanted to do other things and all because I tempted the modelling gods with my rash decision. It was a rookie mistake and one that I hope I will not make again. But — and it is a big ‘but’ — if anything good can come from this, it is that no matter what, mistakes can be rectified and models that seem to be lost, are not always so. In years gone by I would have put my foot on it (after all, I bought the kit(s), so there was no-one to explain my cock-up to…), but in this case I chose not to and despite my initial flash of anger and the cost of a new kit, nothing was really lost.
I’m posting this up on here to illustrate that even those of us who do this for a living, can still make stupid mistakes and when that happens, there is nothing that you can do but take a deep breath, walk away and then come back and sort it out. Oh who am I kidding: next time I’ll smash it with a hammer and then walk away!
See you next time.

I’ve had a very similar story lately. I’ve been working on a Helldiver, which I’ve renamed the Helldriver. And it’s long past it’s due date, ready to have been sent away about a month ago. And I finally finished it not 10 minutes ago. So it’s nice to know that even the expert modelers run with deadlines and things just not going properly. I really enjoyed reading this posting, and I think for my next project I’ll choose something simpler.
By the way is your Youtube channel still on the go? Really have missed seeing video posted there.
LikeLike
If it is any consolation, there have been photos shown of the real aircraft (not yours, but a Mustang in one case) with a star pointing the wrong way! Top of the wing, as a matter of fact…
You know you wanted another Airfix Mustang anyway, right?
LikeLike
Yes Spencer, your slight derailment reminds me when I had to do a review of the Airfix 1/72nd Tunnan for a well known model magazine. Built the model, put the decals on ( Austrian AF )
and wrote the review..All fine and dandy. Even got the mag through the post and seen my results in print..Not long after I met up with the editor at Scale Model World at Telford,
Wandered up to him a chat During our conversation he suddenly mentioned the last edition and that the decals on the Tunnan’s wing’s were the wrong way around. Oh dear….
Just a quick mention of the Spitfire special. Can I order it direct from you or will it be available in the shops?
Tom.
LikeLike
Hi Tom – it will only be available from me, direct. I’ll be posting some ordering information later this week after the proof copies come back to me. Cheers!
LikeLike
The model still looks Splendid !
LikeLike
Thank you!
LikeLike
Had the exact same thing happen to me on PhAF F-5A I was building in one of the blue diamonds schemes, new masking tape, hadn’t checked the tac levels prior to masking and off came the decals along with the tape.
Nothing quite like that stomach churning, heat inducing anger at your own mistakes is there?!
LikeLike
I’m not sure it’s all the frog tapes fault. I’m building an Airfix Be2c currently, the one that is covered in in black and white checker pattern and I’m finding the decals are not adhering as well as previous Airfix models. I think Airfix have changed supplier of their decals, from Cartograf to (?) and quality seems to have suffered.
LikeLike
The decals are still printed by Cartograf – it’s the metal finish. Sometimes it can be almost too smooth and so the decals don’t have enough to bind on to. I was told that they can sometimes feature a waxy element that helps settle the metallic element of the paint and again that reduces adhesion. I’ll look into it further and get back to you…
LikeLike
I have been using Frog Tape, along with Tamiya tape, for a few years now without any problems. The Frog tape I use is the yellow one (looks just like the Tamiya stuff) for delicate surfaces. They market three different type of tapes, which one did you use?
https://www.frogtape.co.uk/products/
LikeLike
The orange one… 🙂
LikeLike
Ah…I’ll stick to the yellow one…
LikeLike
Great article Spencer, I too have had many a frustrating build, and no matter how I try to understand why, the reason eludes me. I have built and painted what I would consider some really good models, others I have just gotten bored with and consigned to either the bin or the cupboard.
LikeLike
Great build, Spence, despite your tribulations. FWIW, I’ve never had a build *not* go sideways at some point. It’s the norm for me, rather than the exception.
LikeLike
Well Spencer i think you did an amazing recovery job there mate, and you are not alone , we ALL do it one way or another , heres an example of how a bloke who’s been modelling for over 40 years and has embraced all the new tools n techniques can also muck things up,
Yesterday i was using red rust pigment on a Tank exhaust , boy that stuff goes everywhere and is hard to clean up, especially from my wifes new white joggers that were at my feet as i was doing this, you reckon YOU have problems !!!
LikeLike
Glad to see you were able to finish this one off, Spencer, even if it meant buying a new kit.
It looks fantastic! I dread having to mask over decals, because in the back of my mind I always have doubts as to their adherence.
LikeLike
Hi, The Model looks great now, though. I have a 1/32 109F with two completely different crosses on the upper wing. I have laid them on, weathered and coat it, and then taken it to a show and tell at the club, before someone asked me why is it like that. I had absolutely no clue and no answer. Sigh!!!
LikeLike
The finished model looks great Spencer. Also, experience and adversity is a great thing in that it is now part of your whole modelling history so it would be something you would look out for the next time you have a similar situation.
You guys who put tape over decals sure have guts. I don’t think I could do that for fear of something like what happened happening. The closest I have ever come to putting tape over decals was a long time ago and then I used post it notes so much less stickyness.
Anyway great save.
Cheers
Chris
LikeLike
Great looking Mustang! Was curious how you blend in your decals? I really like the look you achieve, the natural metal finish with out a clear varnish on it. But my decals always look to shiny.
LikeLike
I love the way that you recovered from this misshap and I won’t say anything about paint masks! 🙂 Not that using painted markings would have made much difference if the tackiness of masking tape is too strong on a NMF surface. I too have had issues with the orange/yellow Frog tape and I now use “Kip” tape. Bought from online painters shops 🙂
A very nice looking model, which I have in my stash and I am looking forward to build 🙂
LikeLike
Hello Spencer, I have been reading through the earlier blogs and this one struck a cord with me. I completed two Revell Fokker Dr1’s and proceeded to gently destroy them by trying to apply a set of Montex masks. That gut renching realisation when all the work you have done turns to you know what….. My two Dr1’s are now resting in a box on a shelf in my work room. At some point I will open the box and finish them. You had a lot more at steak than me so I take my hat off to you in not throwing it out of the window.
Andrew.
LikeLike
Even though I do not work in the publishing field , I too have had the domino effect on a build, in my case a completely painted and decals 1/48 Hasegawa Fw190A . It was the engine cowl fitting a breaking one of the gun barrels on the upper gun panel and it going gone and not to be recovered , thus drilling out to replace both with barrels for brass ones!
LikeLike