
“What this experiment has shown me is that yes, both systems work, but one is considerably more time-consuming and risky than the other”
Several weeks ago I entered into a discussion Online about how best to apply kit decals and if there were some techniques that made the process easier. Questions dealt with the use of decal solutions and whether glossing of the surface of the model being decorated was really necessary . As with all of the discussions, the resulting ideas were interesting and far-reaching and without exception, the chat was cordial and fun.
Having seen the conversation evolve, I offered my thoughts and how I always gloss a model before applying decals in order to reduce as much as possible the appearance of silvering under each individual design. For anyone that is new to this hobby, ‘silvering’ occurs when a microscopic layer of air is trapped between a rough paint finish (as created by matt and satin paint) and the underside of a decal, air that then allows light to bounce around to create a slightly metallic look, hence the description. The only way to easily counter this is to ensure that the finish is perfectly smooth before the decal is applied – hence in my opinion, the need for the gloss coat, or the polishing of the paintwork to remove its rough surface.
During the discussion, a chap offered some very nicely painted models onto which he had applied some decals over a matt finish and so countered my point with his thoughts that it was not necessary to pre-finish a model in gloss, modern decal solutions taking away the risk of silvering without that additional step. Impressed by his models an intrigued by the idea that a gloss finish was not needed, I went away to see if this was true.
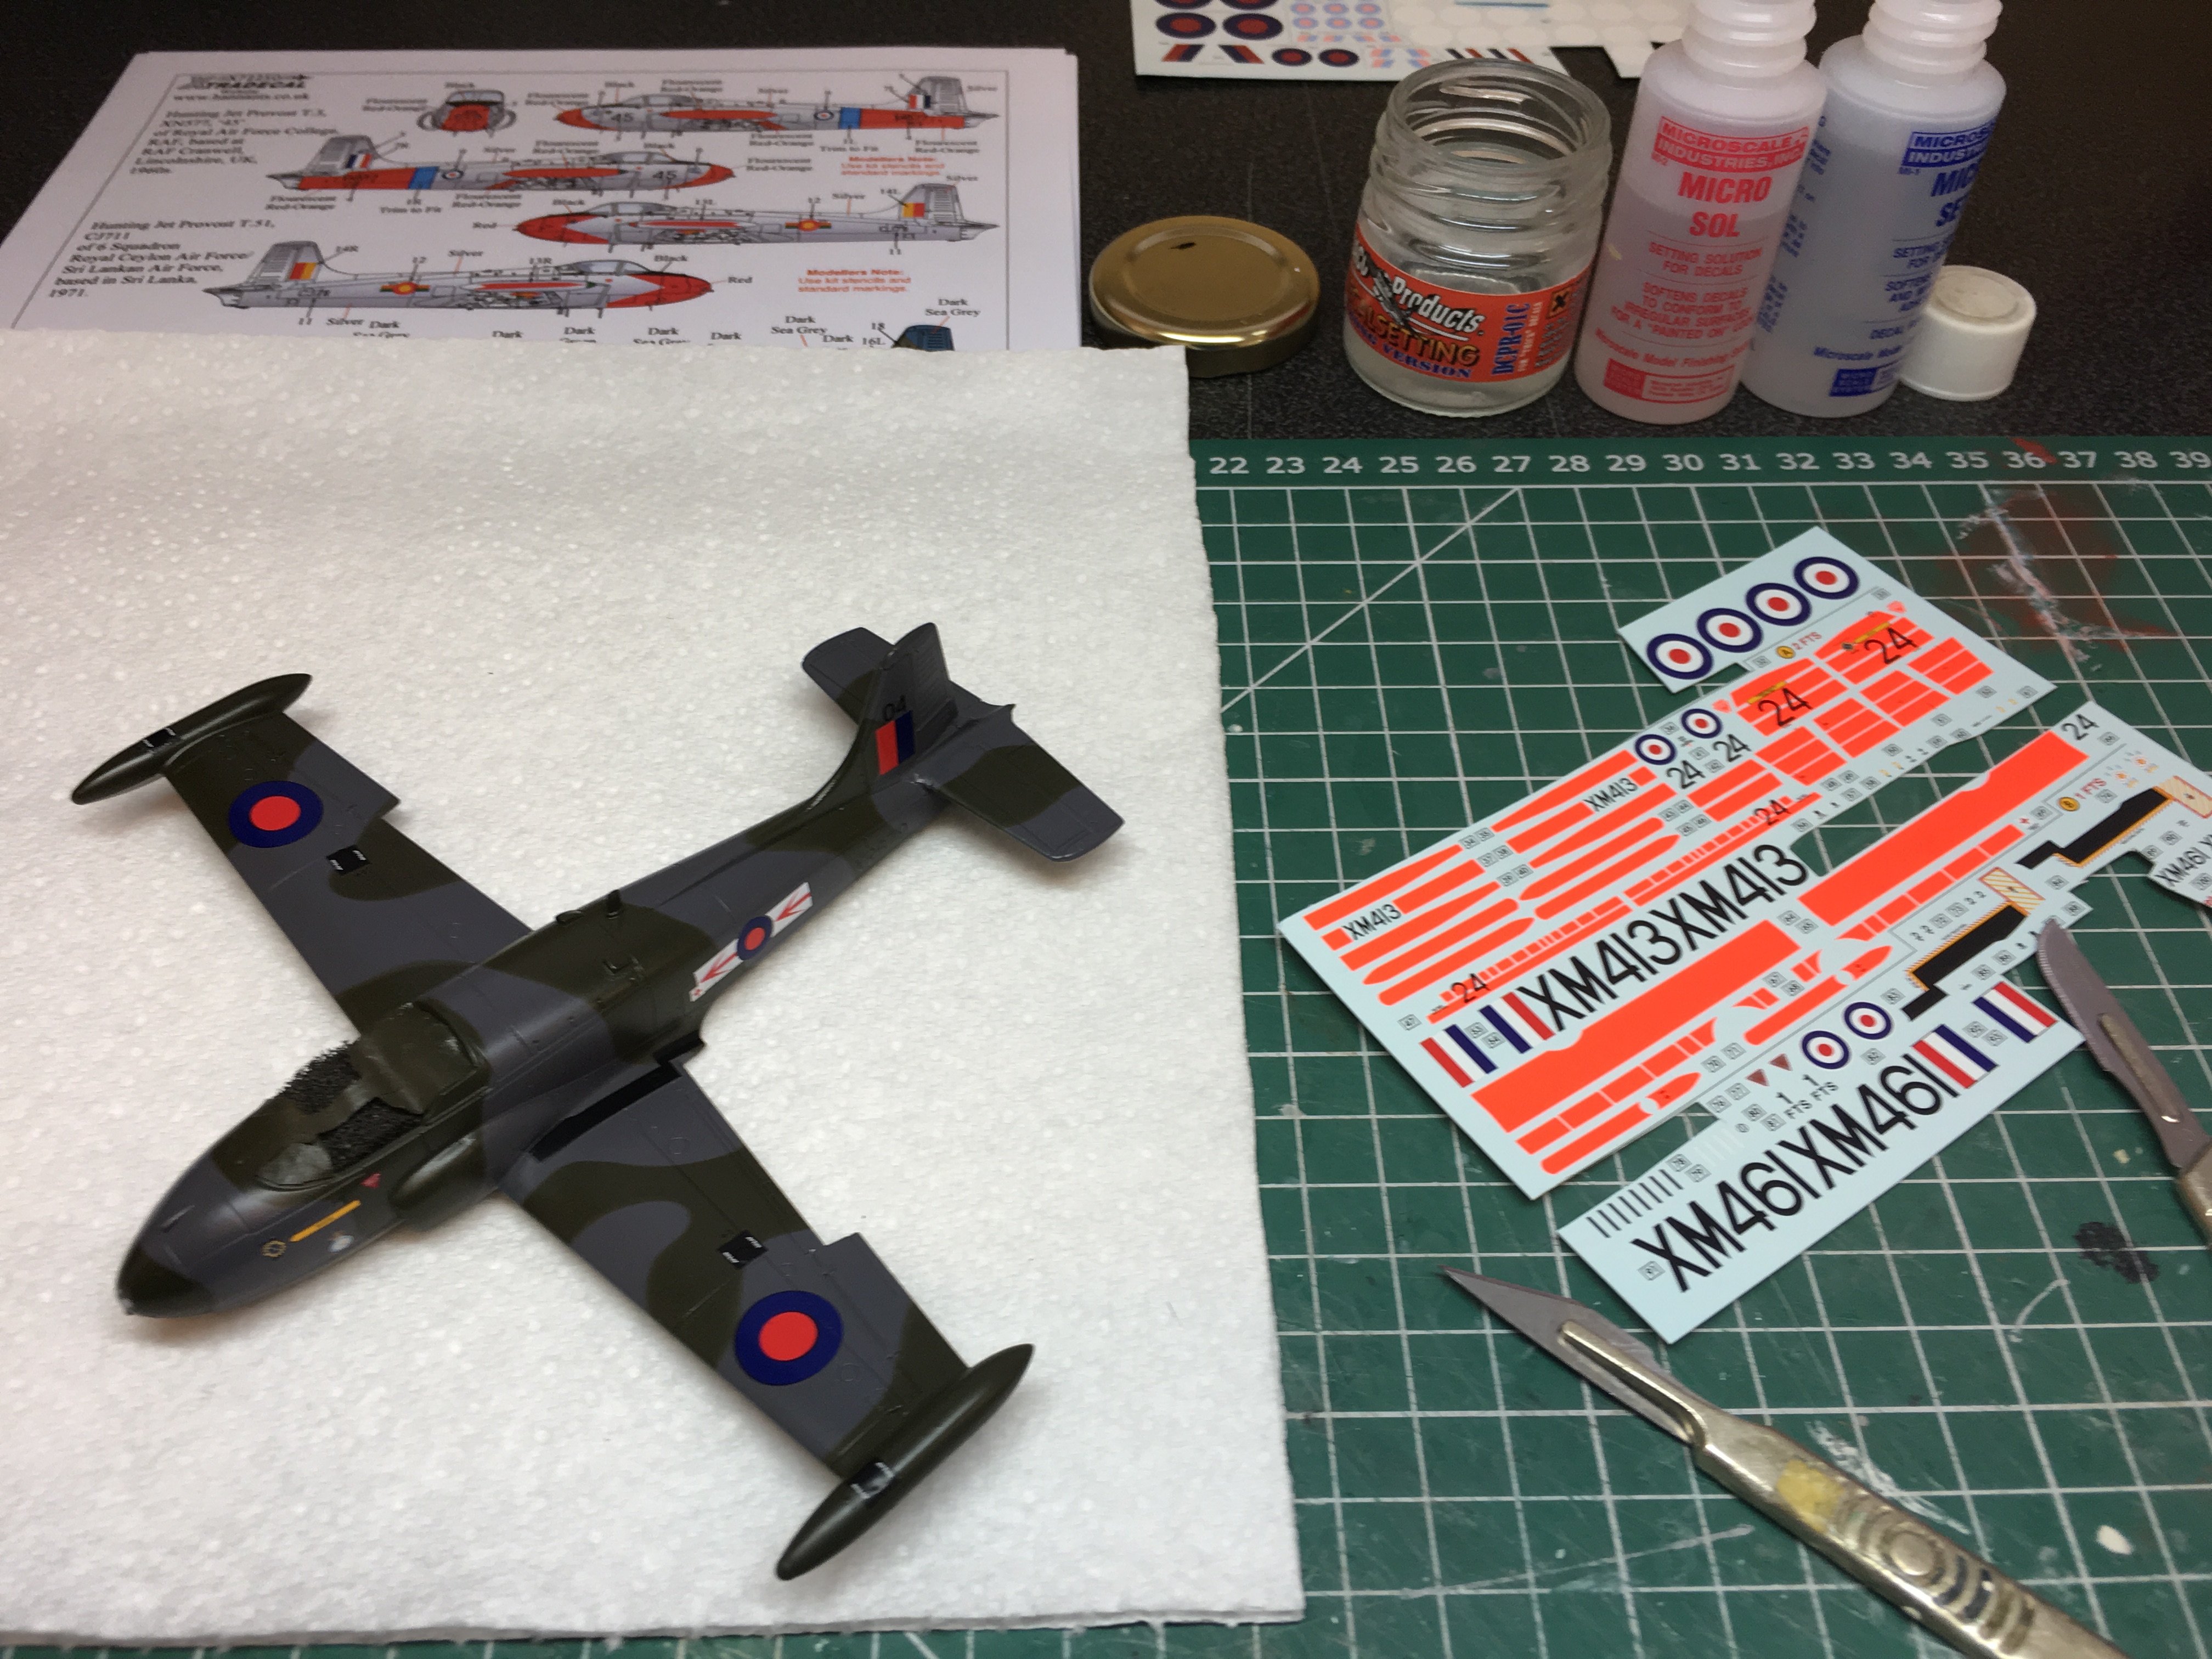
So today, in the cause of furthering my own knowledge and imparting the results to you, I sprayed the upper surfaces of my Airfix Jet Provost with a layer of Tamiya X-22 Clear and then left the undersides in virgin, Mr. Hobby Light Aircraft Grey which has a satin finish. The model was left to dry and then checked over before grabbing my chosen decal sheet and making a start. In order to create a consistent result, all decals were applied using Micro Sol and Set and also DACO’s Strong setting solution for any that needed to work over compound curves or larger pockets of detail. Upper and lower surfaces were treated in an identical manner, nothing else being brought into this experiment. Photos were taken in real time.
On both finishes, the decals were laid down over Micro Set and then the excess fluid wicked away with a soft brush, the brush also dealing with any trapped air, before applying either Micro Sol or DACO Strong. The decals were then left to dry out, nothing being touched until all evidence of wrinkling had disappeared.
It was now time to check the results.
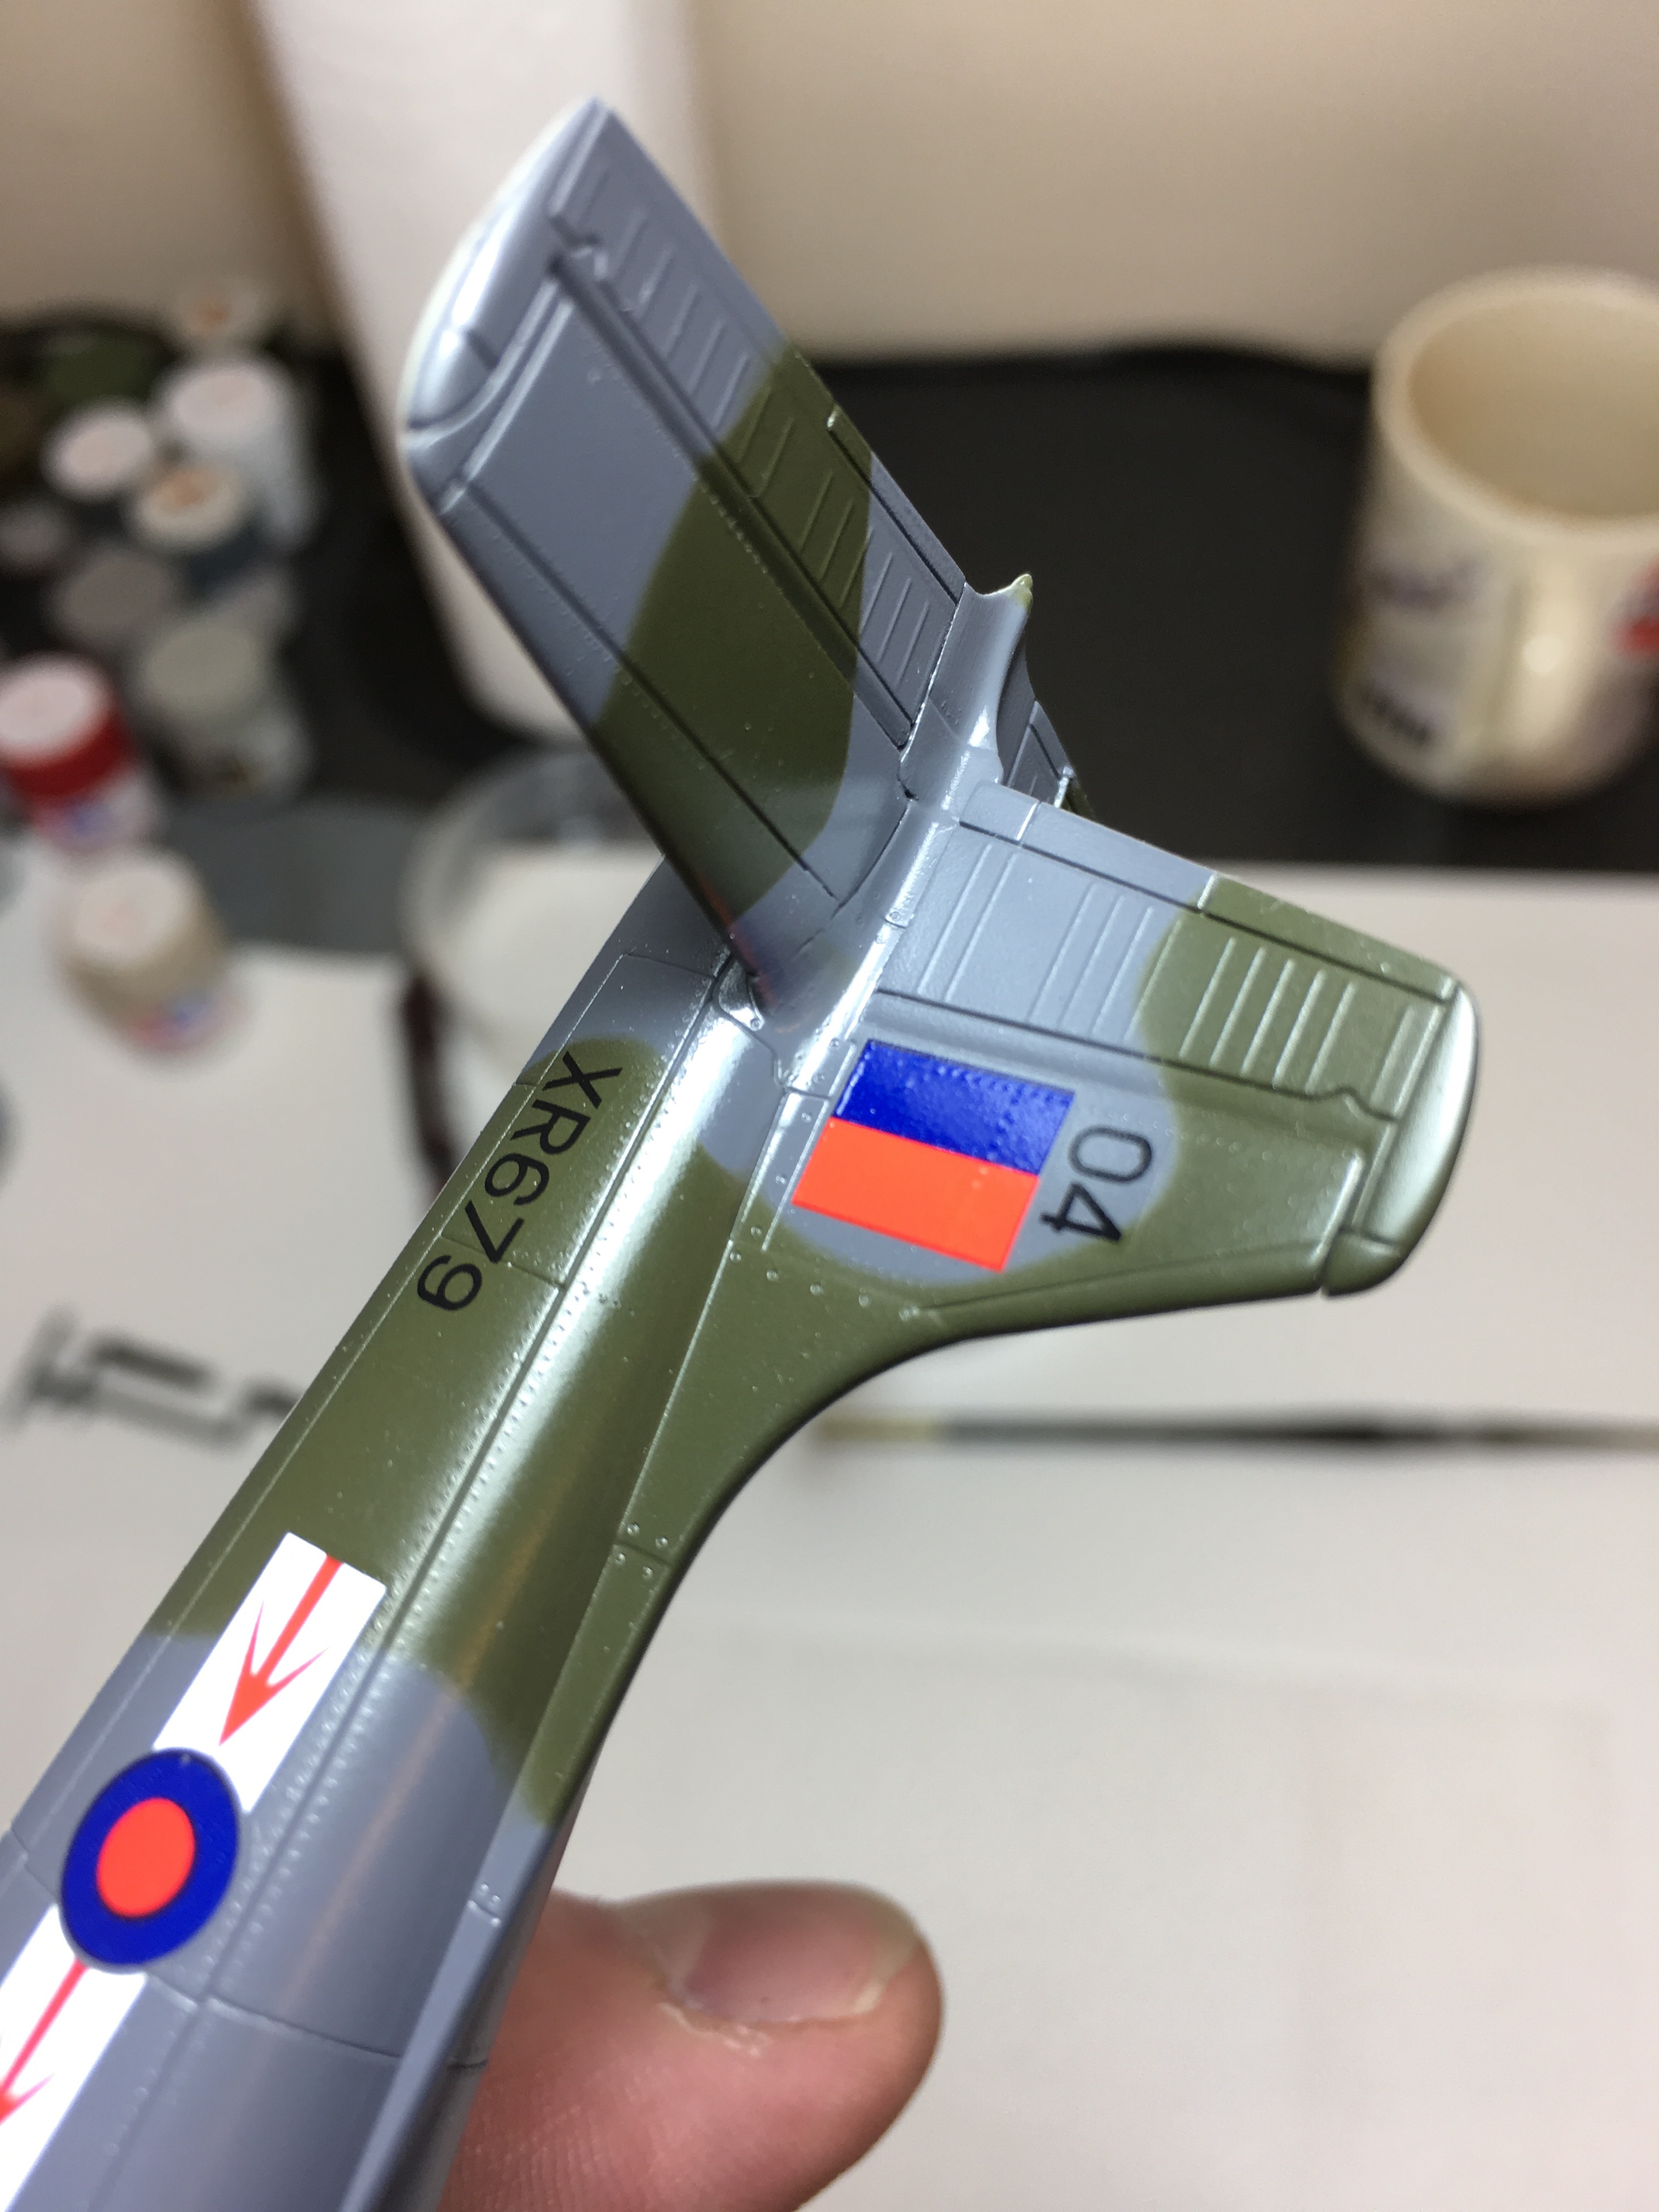
Upon my return to the model, all of the decals on the upper surface had laid down with no evidence of silvering, the use of Microscale’s liquids and then DACO’s on the trickier items, creating the illusion of markings that did indeed look painted on. However, those on the underside were nowhere near as acceptable, silvering being visible across their entire surface. In essence, the system had worked perfectly when the use of a gloss finish had been employed and failed when I decided to forgo it. To be honest, that’s exactly what I expected would happen!
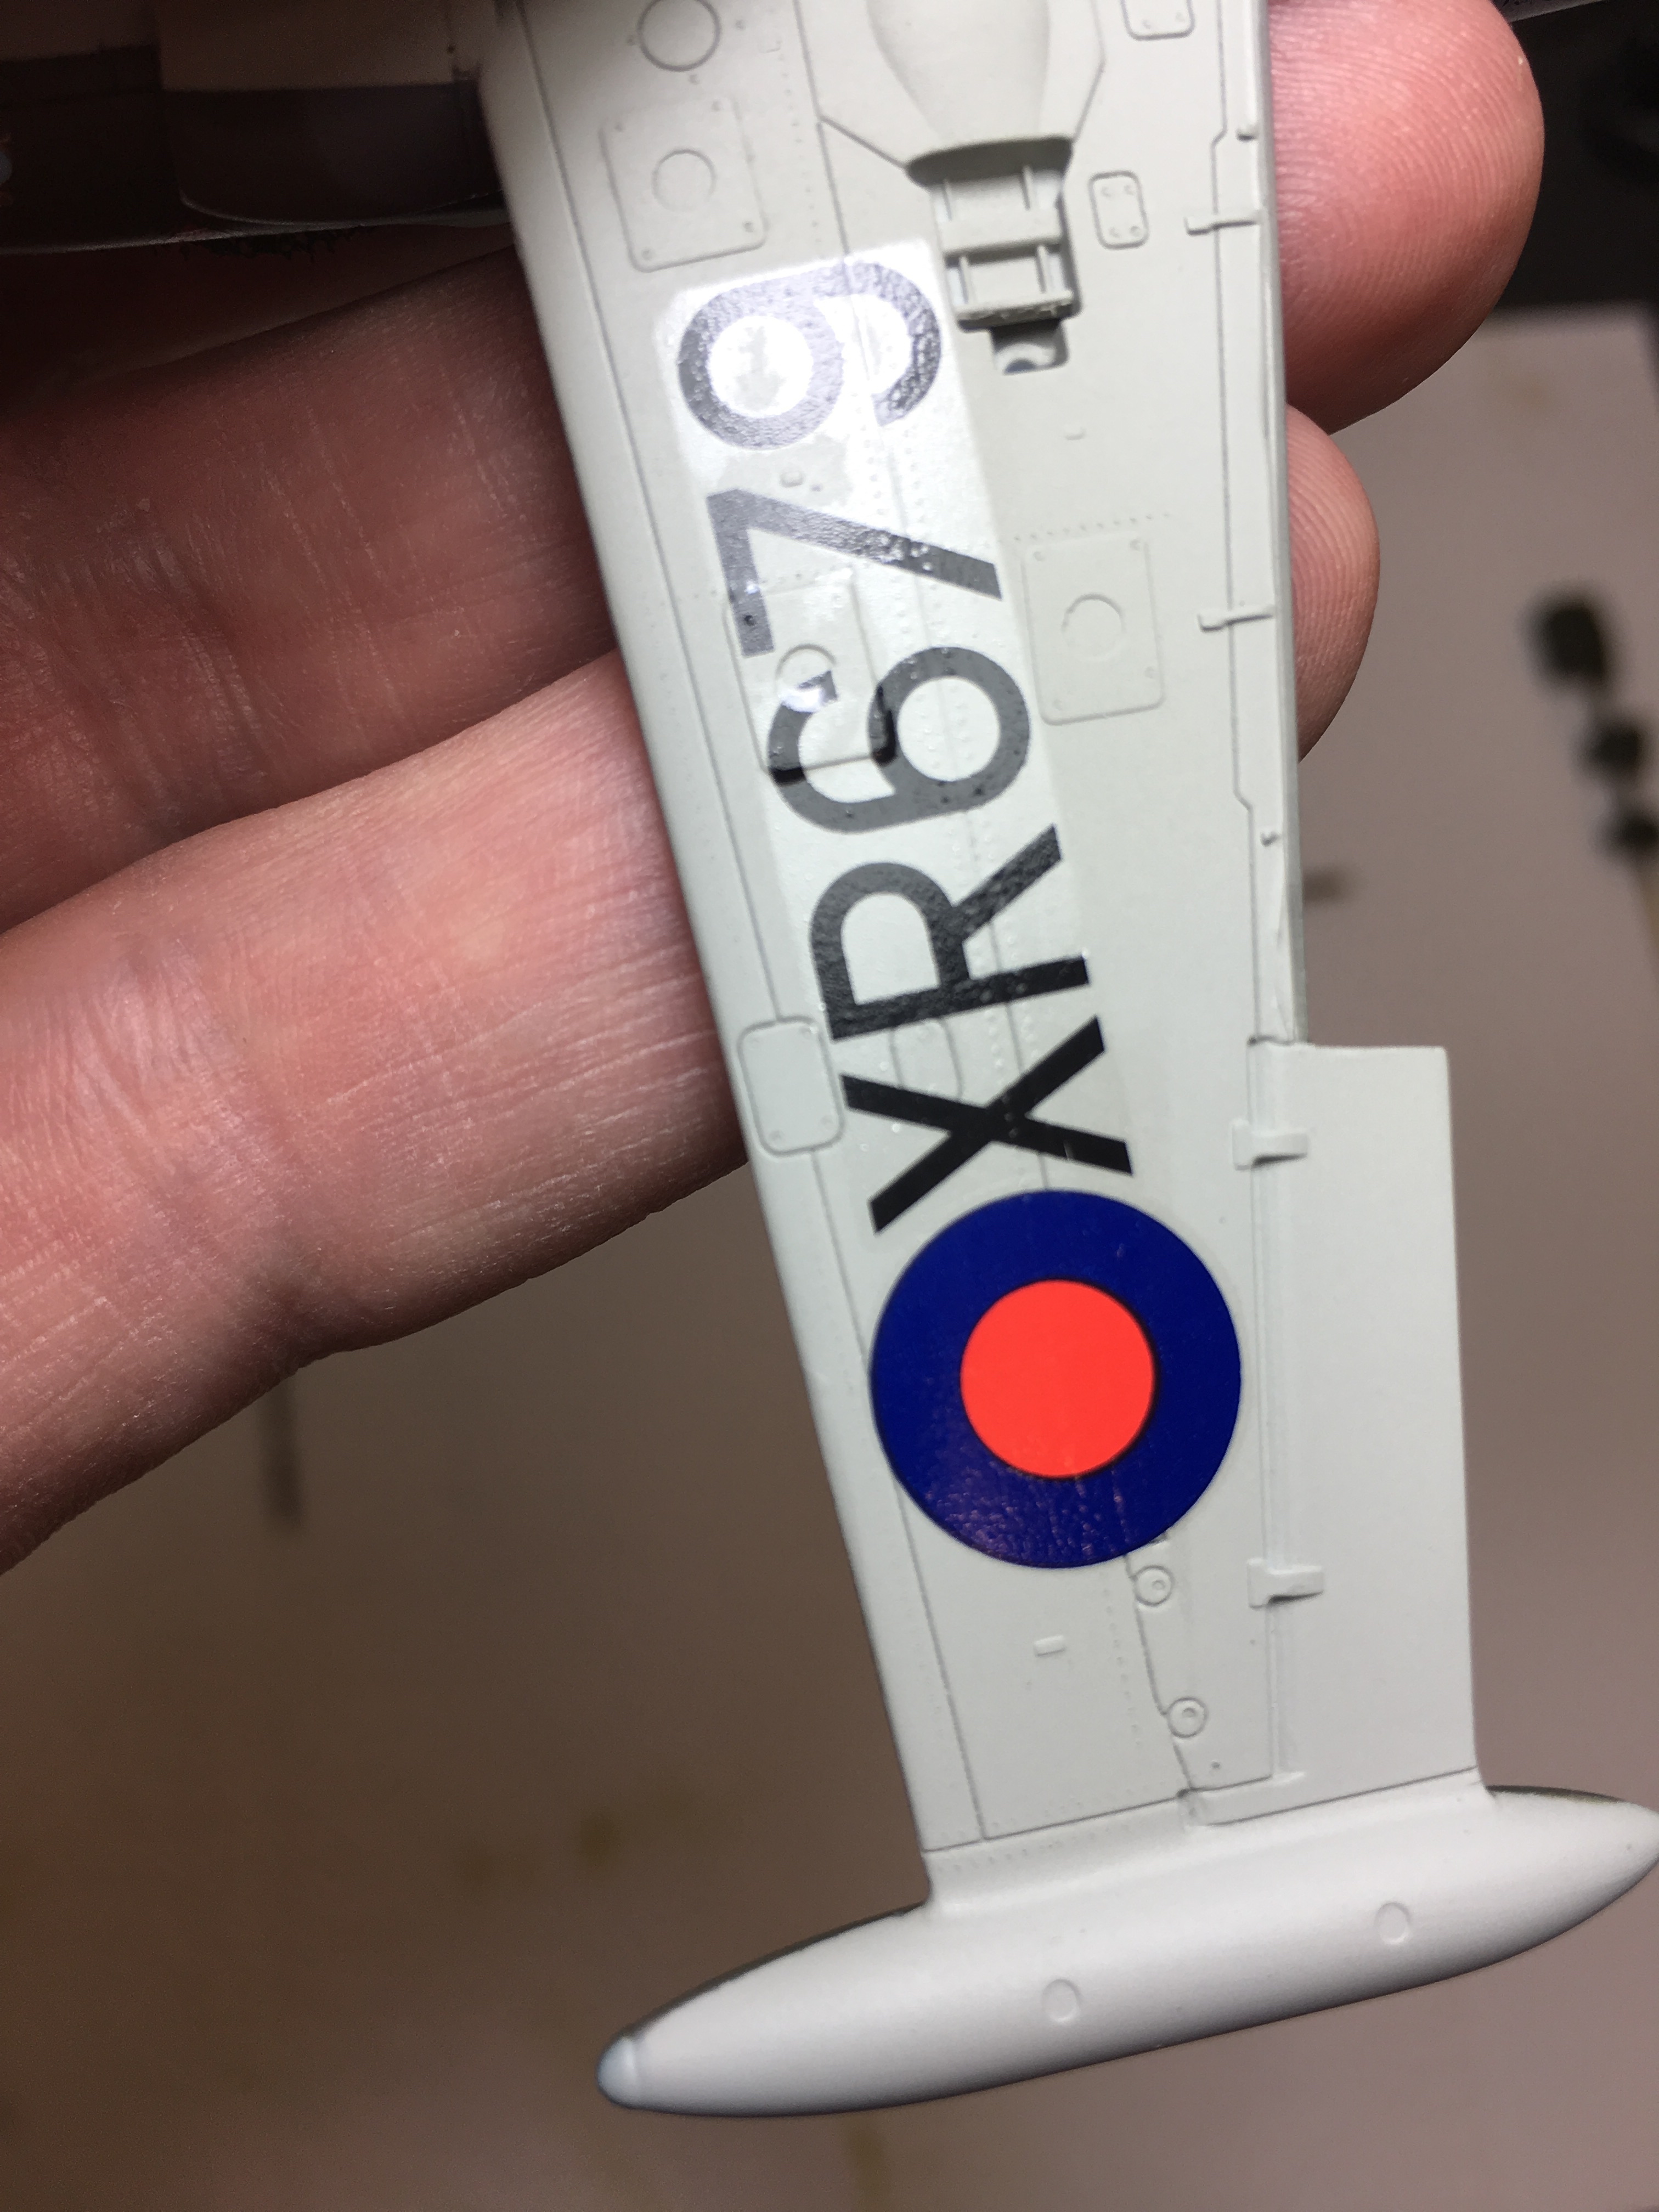
Now I had a model that was less that impressive! In order to alleviate the silvering under the wings, a brand-new No.10A scalpel blade was run across the surface of the decals and then a layer of DACO’s solution was painted on and left to dry. This was then repeated three times until the decal had settled down. Once dry, I have to say that there was almost no evidence of silvering, but each marking had taken three times as long to apply as would have been the case if I had sprayed the undersides with the same clear coat as used for the upper surfaces.

What this experiment has shown me is that yes, both systems work, but one is considerably more time-consuming and risky than the other. Applying decals to a flat finish can be done, but in this case it needed repeated applications of my most concentrated fluids to get anywhere near what would have been possible with the upper surface decals, even with no setting solutions. It just wasn’t worth the aggravation. In essence I spent far longer trying to get two decals to settle down, than I spent spraying the entire model with a gloss coat ready to begin decalling in the first place. Where’s the sense in that?!
I’m all for an easy life and so won’t be swapping my tried and trusted method of applying decals any time soon – even if as proved here, not using a gloss coat can result in decals that look acceptable. I’m just glad in this case that my rather fly decision to experiment on a time-sensitive model paid off – I’m not sure what I would have done if I couldn’t have pulled those silvered decals back from the brink of a mistake that was entirely of my own making…

Hi Spencer. It’s an interesting experiment you’ve done. I’ve seen videos purporting to remove the need of any gloss surface for the application of decals AND still not silver. I think you’re comment regarding the repeated application of setting solutions in this circumstance is accurate. An issue I’ve seen though in this circumstance is the reaction that some setting solutions have when left to work on decals exposed to paint that has not been sealed. The worst case I’ve seen was the paint splitting and needing a rework. I think it may have been a Mr Softer solution but I can’t remember the paint brand.
I think I’d rather seal my paint before decals as it not only offers a protective coat for the paint but also a suitable surface to weather upon. Though to weather or not to weather is another kettle of fish.
Interesting result.
Mick
LikeLike
Is Daco Strong available in the US?
LikeLike
Not sure – I’ll check…
LikeLike
I still have trouble enough even over a gloss surface! I couldn’t imagine the trouble I’d get myself in to trying to apply decals over matt paint. One technique I’ve had a bit of luck with lately – especially with pesky stencils – is to soak the decals in a mix of water and Future (say, 80:20 or so). Too much Future and the decals don’t soak off the paper properly, but when it works, the decal ends up with a thin layer of Future underneath it, which seems to aid in preventing silvering on decals with a lot of exposed carrier film.
LikeLike
Thanks Spencer…I’m with Kevin here as well. Tried + Proven = Success (mostly). It’s not dogma in this case, but scientific.
LikeLike
Hi Spencer. Thank You for this it’s saved me from running a similar experiment. I’ve been told that polishing the matt/satin surface works without altering the final colour, which, in their opinion, varnishing does. However my tests reveal no difference between matt over paint as against matt over gloss over paint. For AFVs I tend to spot gloss as there are few markings. Do you find applying an overall gloss coat works best for aircraft (an area I’m just starting to get interested in).
LikeLike
Thanks Spencer – a great article. I’ve been modelling for a few years but have never used the gloss coat decalling method and have had mixed results with Microsol/set. The reason I’ve never used a gloss coat is that I’ve never been convinced about how you get back to a matt finish after the deals have been applied (assuming a Matt finish at end of the build is what you want). Do you have any follow up comment to your article about how well the follow-up coat of Matt varnish or other method after decalling actually gets you back to a true matt finish?
LikeLike
Your JP looks gorgeous. Do you have a link to the build itself?
Thanks
Chris
LikeLike
Hello mate, a detailed build feature will appear in the May issue of Model Airplane International magazine. Thanks for the interest! 🙂
LikeLike