
Get the best from Hasegawa’s 1:48 A-4M Skyhawk II, using basic ideas, simple tools and enamel paints!
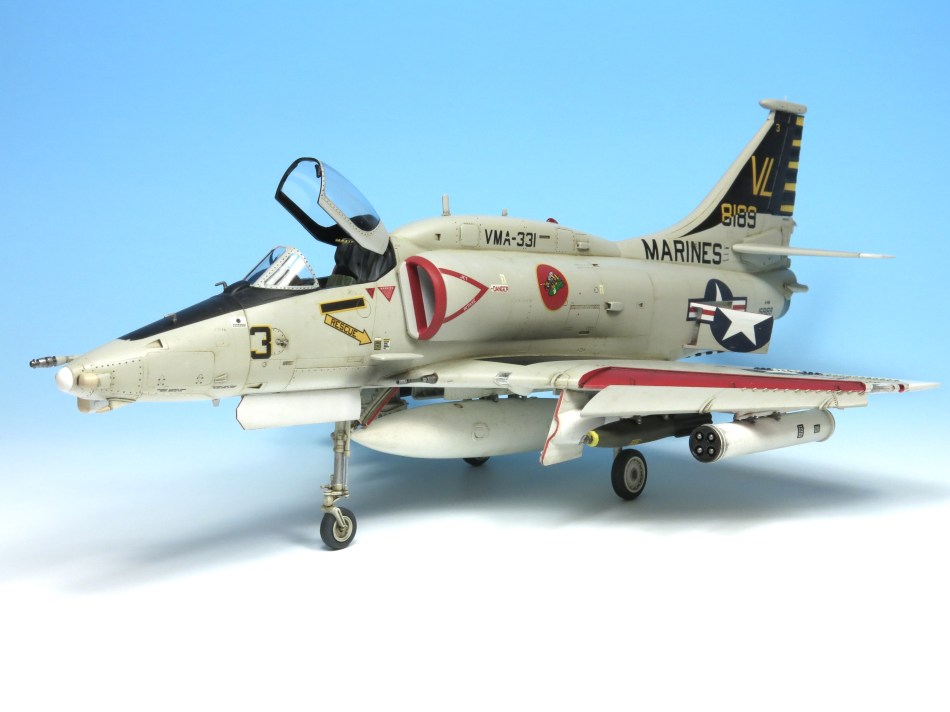
“Ever since Matchbox released their 1/72 kit – complete with the same VMA-331 markings seen on this one – I’ve wanted to build a detailed model of this aircraft”
In Miniature
Widely regarded as one of the finest 1/48 jet kits ever made, Hasegawa’s family of A-4 Skyhawks is a perfect example of what is possible when you take a cool subject, replicate it in one easy to build package and then offer multiple versions to spice things up a little. Available in both single and two-seat variants, Hasegawa’s collection replicates virtually every mark of A-4 and those kits, combined with an incredible number of aftermarket accessories and decal sheets, allows the modeller the opportunity to build a huge collection from one basic set of mouldings: they are almost a one-stop-shop, for fans of this important aircraft.
From the off, Hasegawa decided that their kit would be modular, clever breakdown of the fuselage allowing for variations to be incorporated with simple inserts into the moulds. These included – in the case of the early single-seaters – new nose cones, upper fin tops, pylons, aerials etc. and then as we see here for the remodelled Mike-model, Skyhawk II and two-seat TA-4J, new fuselage halves, cockpit interiors and canopies. Cross kitting also allows further variation and as was seen in an earlier build completed by this author, the chance to build the as-yet unseen, OA-4M.
Though historically this approach has often resulted in kits that were perhaps less than easy to build (Fujimi’s 1/72 Harrier family, being a good example…) Hasegawa seem to have brought their A-Game to this one, so all of the parts come together seamlessly, making construction and subsequent painting a pleasant experience: it must be, I have three under my belt and have plans for two more!
Our Model…
Having built an early A-4C and a converted OA-4M, I was keen to tackle my favourite A-4 variant, the punchy A-4M Skyhawk II. Ever since Matchbox released their 1/72 kit – complete with the same VMA-331 markings seen on this one – I’ve wanted to build a detailed model of this aircraft. Quite why it took so long is a mystery, but I’m pleased that finally, I have one on the shelves, the aggressive lines of this little aircraft contrasting nicely with the sleeker curves of other, more glamorous types.
Having chosen to build the A-4M, I gave some thought to how best to present it as a feature. Sure, there are plenty of aftermarket details on the market and so I could have taken that route, adding a new cockpit, maybe using some new decals or etched details. But I didn’t want to do that. Instead, I decided to build this kit from the box and in so doing, turn the clock back twenty years and see if a model built and painted using ideas and techniques back then, could stand up to models built using new, cutting-edge techniques and materials in 2013. So, decision made, I elected to build the kit from the box, use only basic tools and then finish it using only enamels and oil paints – just as I would have done at the beginning of the nineties and just as, I am sure, many modellers around the world still do.
Construction Begins
As with most models that I build I tend to warm up by bringing together everything that’s in two halves, minor sub-assemblies, cockpit, seat and in this case, construct the fuselage halves. Let me explain. The fuselage comprises six major pieces, two rear sections, two nose cone halves and two hump halves. In order to ensure that their joints were nice and smooth, it was decided to create two large halves by gluing the nose and hump pieces in place, any filling then being along their upper edges rather than across the delicate surface detail that decorates the model.
I also chose to clean up some of the smaller parts, either leaving them attached to the runners by tabs that would be invisible on the completed model, or by removing them, cleaning up any burrs and then mounting them on cocktail sticks, either in pre-drilled holes, or by using small blobs of White Tack. I could now get cracking on the fun bits, beginning with the cockpit…

Though the aftermarket is full of replacements for the Skyhawk’s ‘pit, the kit parts were deemed suitable for this out-of-the box project, careful construction and painting being more than enough to satisfy me. Hasegawa supply some really neat detail on the instrument panels and side consoles that would benefit from careful painting, which is exactly how I approached the side consoles. Following a basecoat of Humbrol Neutral Grey, the panels were picked out in matt black and then drybrushed with a pale grey shade to pop the switches. Some additional work with white, yellow and red helped create a neat recreation of the real consoles and so I was happy to move on to the instrument panel. Here, I chose not to paint the details, but rather use the supplied decal applied directly over the raised detail. By using Gunze Sangyo Mr Mark Softer, the decal settled down perfectly over the dials and switches to create a most pleasing replica of the real panel. A few drops of gloss varnish into each of the dials and a little additional painting here and there and it was ready to fitted inside the cockpit.
This model is a tail-sitter and so with the cockpit tub glued in place, some five-minute epoxy was mixed with some of Ripmax’ ‘Keel Ballast’ and then dripped into the nose. Because of the glue, this mixture self-levels and then sets hard, never to move again!
Before joining the fuselage halves, the inside of the intake and the jet pipe needed to be assembled and painted according to the instructions. Though the intakes are small, they are open enough to be able see the fan detail and so care was taken to first paint the insides of the intakes and the trumpet-shaped structure that sits inside the fuselage in Humbrol Satin White, before picking out the fan in Games Workshop Boltgun Metal (the only time an acrylic colour was used on the model).
If the intakes offered a level of internal detail, the jet pipe certainly did not and though there is a fan at one end, it is invisible in the completed structure and so I was happy to simply prime the parts and then coat them in a layer of Alclad II Steel before moving on. Whilst the airbrush was full of this colour, the jet pipe and the gun barrels were sprayed and set aside for use later.

One of my favorite kits to build, do about 1a year, now have a collection of 19 built Skyhawks, never tire of this kit always finding better ways to build it.
LikeLike