“What this episode seeks to prove is that you should plan ahead and if possible, not change direction midway through a project”
Having already used a rather famous quote I’m loathed to repeat the trick, but there is a proverb that says: measure twice and cut once. Coming from the carpentry world, this literally means that you should double-check one’s measurements for accuracy before cutting a piece of wood; otherwise it may be necessary to cut again, wasting time and material. It’s a sensible guide to most things in life and a saying that I have heard many, many times. So why then, when this note is so familiar, do I forget its core message so often?
This week I’ve discussed the construction and painting of MENG’s rather splendid 1:48 P-51D and in so doing, its cutting-edge engineering and design. What I haven’t so far revealed are my plans for it as a completed model rather than an on-going project, so here goes. Be warned: the following my well shatter a few illusions about my planning and ability to complete a project without incident.
Those of you who know the P-51 with be aware that when they left the factory, the laminar-flow wings were smoothed over by having their panel lines filled, sanded, polished and then everything finished with aluminium paint. The rest of the aircraft was left alone, so there was a distinct difference in look between the wings and the rest of the airframe and this was therefore something I was keen to replicate in miniature. Filler in hand (Gunze Sangyo Mr. Putty R for the more inquisitive amongst you) I set about removing any trace of the panel lines and rivets that MENG had so impressively created on the upper and lower surfaces of their wings. Once dry, the filler was sanded smooth using wet ’n’ dry — used wet — and then the whole shooting match sprayed with several layers of filler primer.
“All that work on the wings seemed to have been wasted and though I could have simply banked the decals and chosen something else, the idea of spending so much money on them and then not using anything, was out of the question.”
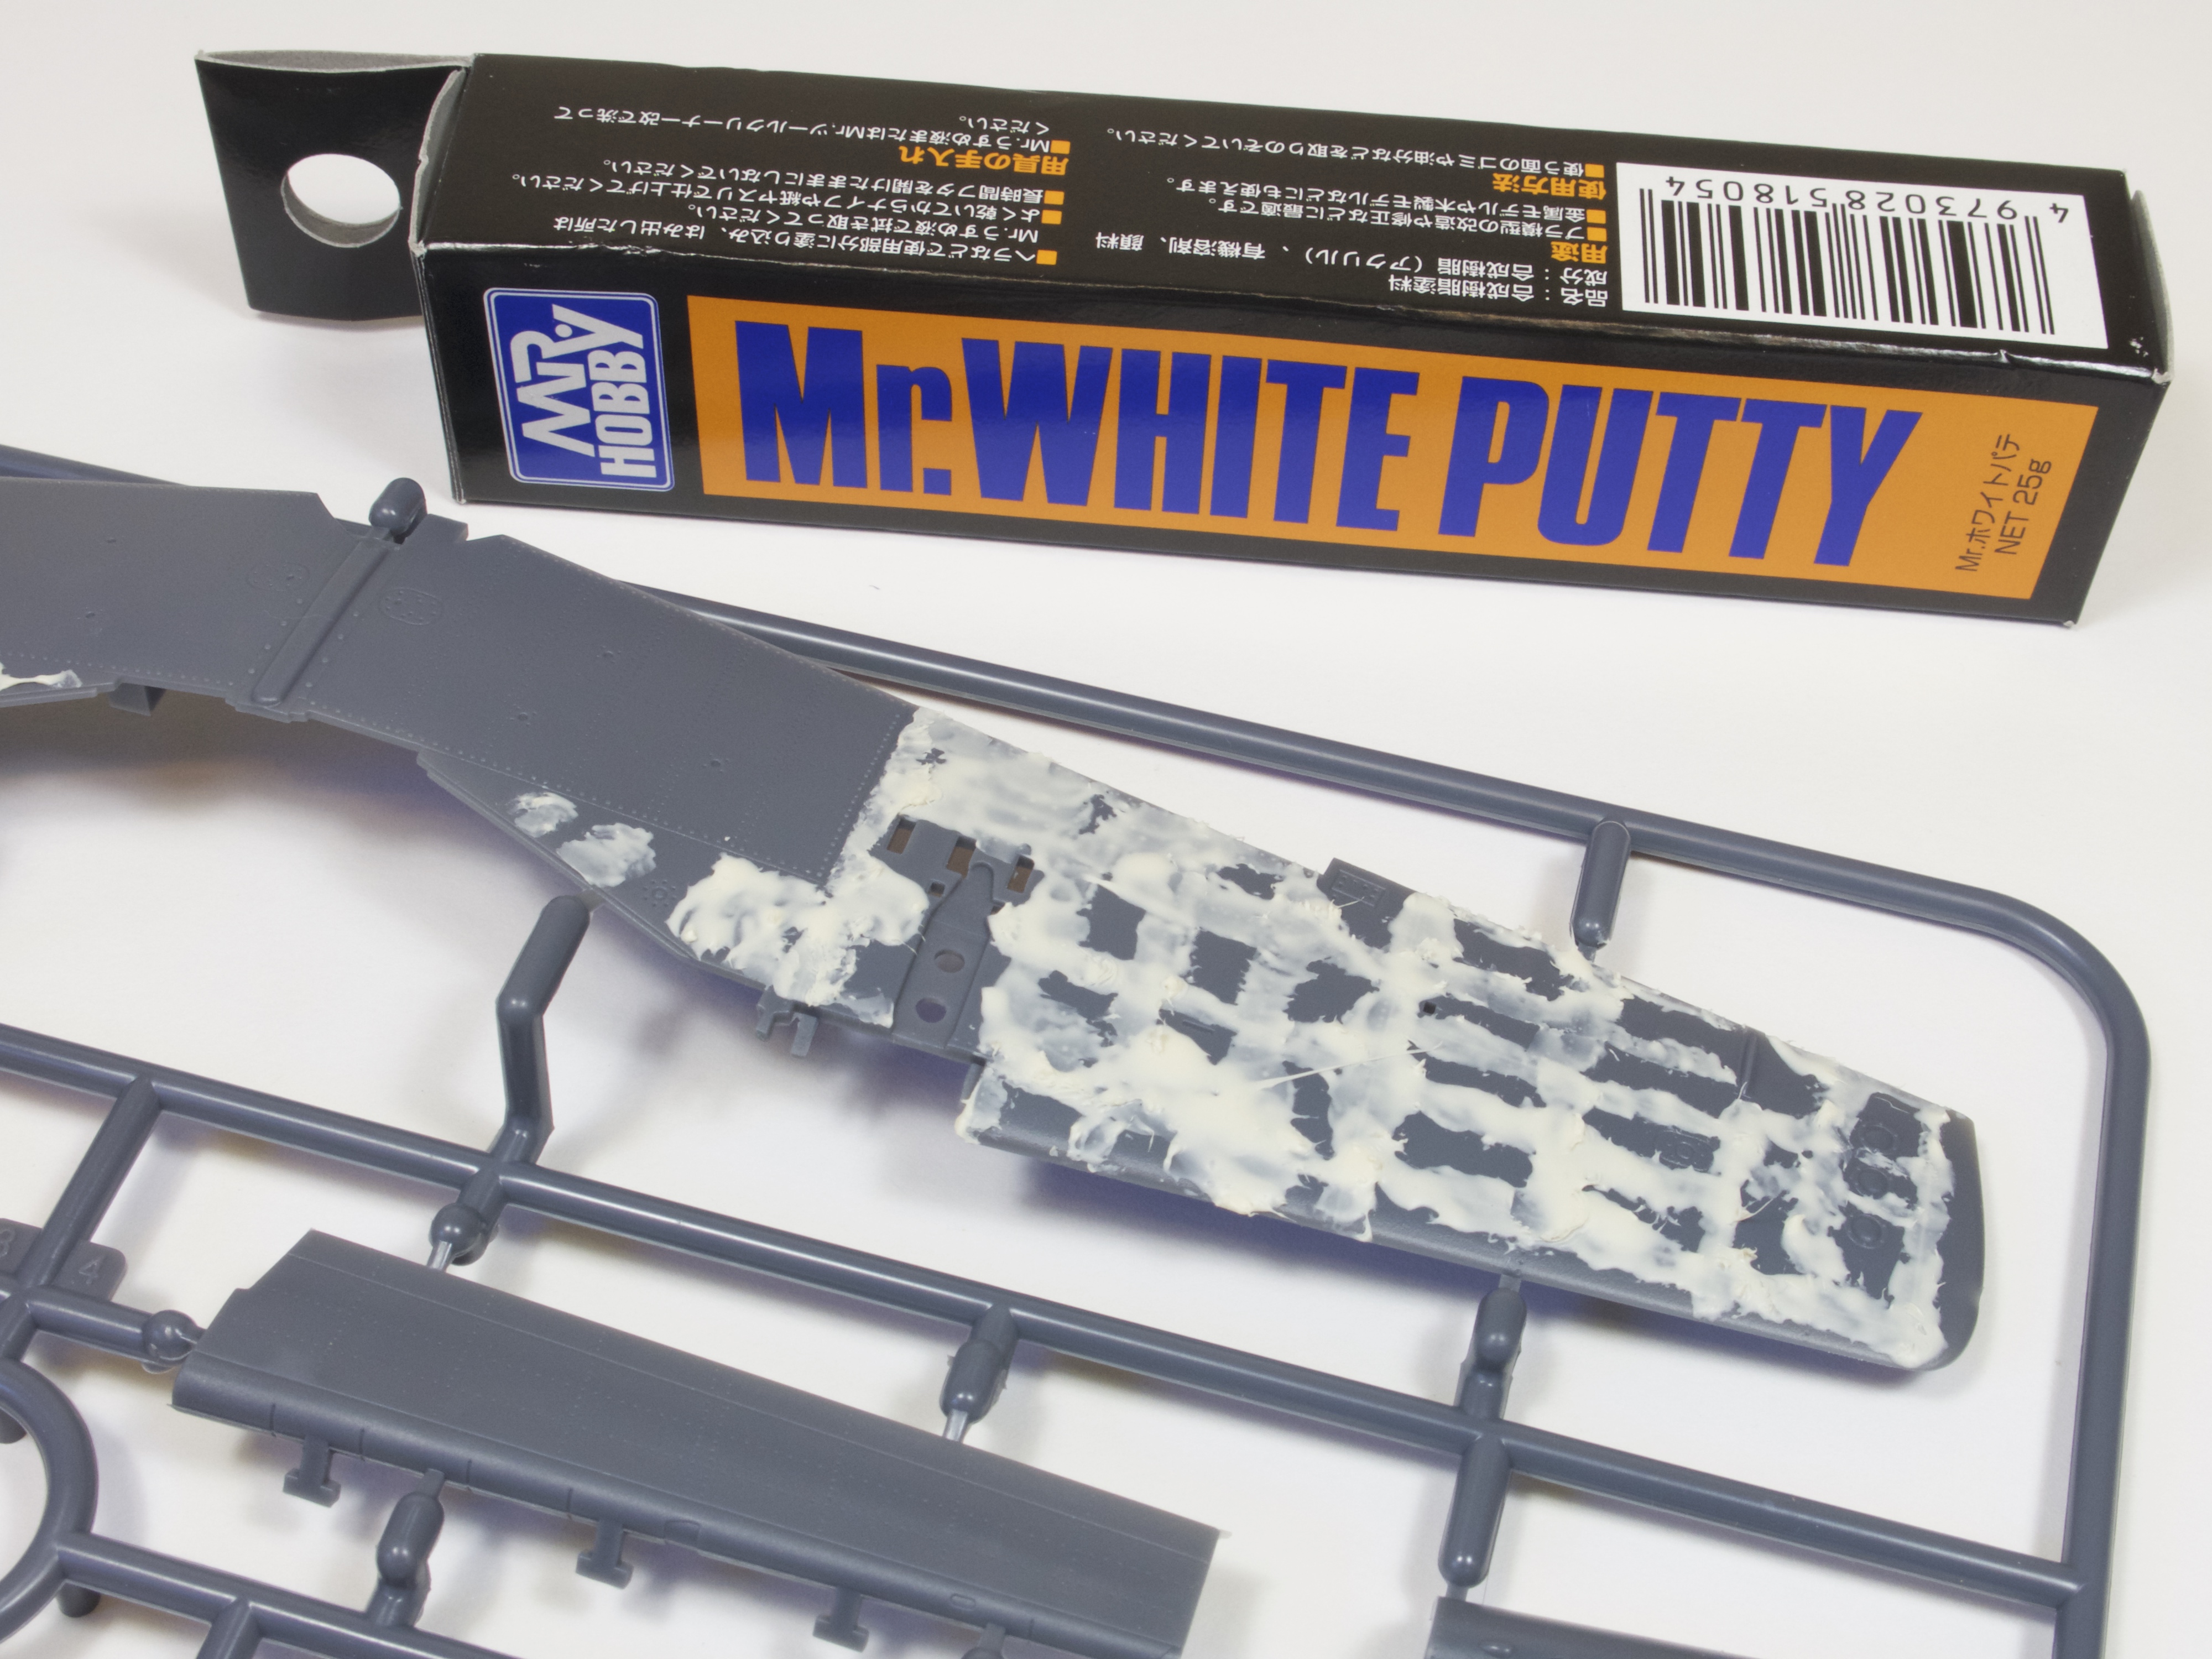
Now, though none of this was exactly difficult, it was time consuming and thanks to the need to spend what seemed like several thousand hours last year sanding the Harrier in submission, not something that my now rather fragile hands, can deal with on a regular basis. Still, I managed to get it done and was happy that the wings would look great under aluminium paint, in contrast to the fuselage that I would be finishing in ‘natural metal’.
And then I decided not to build either of the kit options and hunted for something different to get the juices flowing.
I wrote yesterday about my seemingly endless need to build unusual models in unusual schemes and so it will come as little surprise to hear that the Mustang was going to fall down that same rather deep rabbit hole. Hunting through the ball of string that is Hannants’ decal lists, I happened upon a smart looking aftermarket sheet that covered a cluster of fine-looking Canadian Mustangs and after falling for the silver and red aircraft, the sheet was ordered and I sat back and waited for it to arrive.
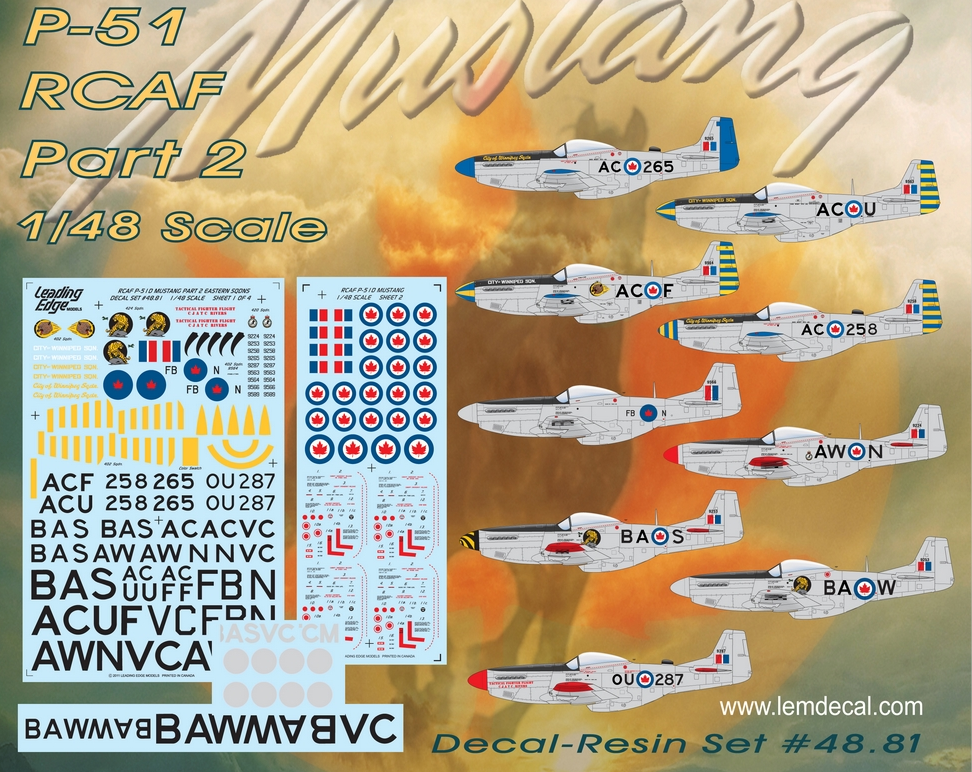
With the decals to hand I started to examine the possibilities and how I would paint the chosen scheme. All was going well until I noticed two things: some of the aircraft had matt black cockpits (mine was green) and some aircraft were painted OVERALL in aluminium paint. I didn’t really know whether to laugh or cry. Straight from the bat half of the schemes on the sheet were dismissed because of the black cockpit and that included my first choice. The one scheme that was a mixture of paint and metal was out because it was — to put it mildly — boring and so that left several aircraft that despite being attractive, were finished in overall aluminium. Any hope that I could show off the different surface finishes was gone.
I was fuming.
All that work on the wings seemed to have been wasted and though I could have simply banked the decals and chosen something else, the idea of spending so much money on them and then not using anything, was out of the question. So reluctantly, I chose another scheme, painted the model in its aluminium plumage and will apply the decals today – and then perhaps plan to build another P-51 so that I can at last have a punt at recreating the finish that I wanted to incorporate into this project.
What this episode seeks to prove is that you should plan ahead and if possible, not change direction midway through a project. If I had spent some time investigating different colour schemes before cutting plastic, I would have been able to make a more informed choice and thus complete the model as I wanted it to be completed and not be forced into the compromised decision that I was. It would also have resulted in a more interesting feature, the depiction of a black cockpit rather than the familiar Interior Green office, being not only unusual to say the least, but a challenge to paint.
So, next time I will plan ahead and not try and be too clever. As for the P-51, hopefully that will be revealed next week and then I can move on to an F-16 that I’m building, having already decided on it’s colour scheme, details and weapons – how’s that for forward planning?

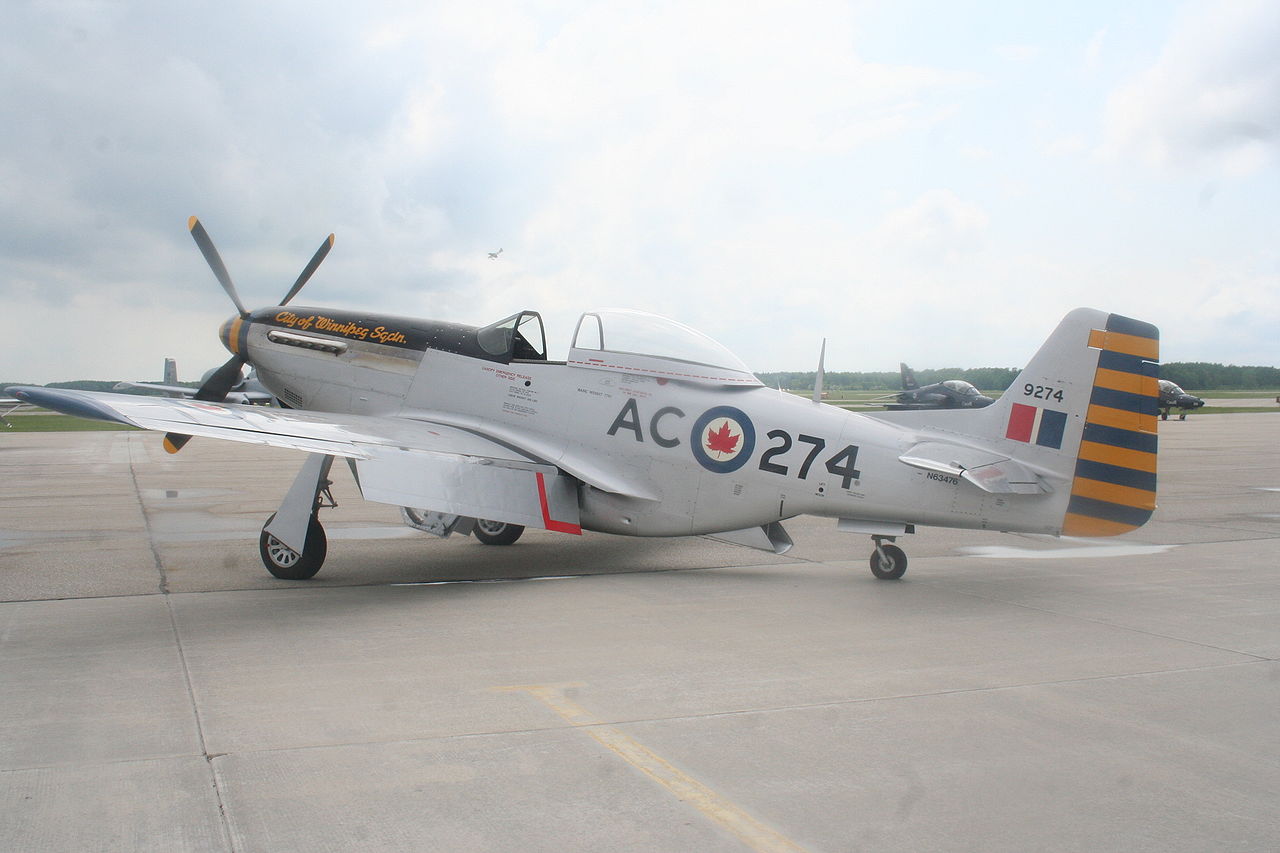
I’ve noticed that the photograph in the heading of this article is a contemporary one. Could it be that the actual historical version would be your preferred mix of paint and natural metal?
LikeLike
The header is just really an illustration of how the scheme looks. The actual aircraft was finished in a very similar manner in overall, aluminium paint. Thanks for the comment! 🙂
LikeLike
” measure twice and cut once. Coming from the carpentry world” which is true enough but having build a lot of stuff the other end of that is cut it a bit longer and try it. if it is too long refine your cut until it does because you can cut some off but you can not add on. Being a student of our arm forces l learned that our aircraft schemes were all over the board and sometime it can be both BMF and painted aluminum depending upon the time period . The Starfighter is a good example of that and so is the mustang. Do not feel too upset as once done with a gloss coat you will see it is a nice scheme. As for me l plan to the City of Hamilton scheme as the city is only 20 minutes from where l live and so it the warplane museum
LikeLike
I found the Gunze liquid putty works like a charm. It flow into what you want filled. And easy to sand smooth. Spare your headaches. My P-51 I painted the new Mig Metallic paint when they first came out. The silver never dried. The paint remained tacky. What a mess to fix.
LikeLike