
“Weathering a model is all a matter of personal taste and though I like my models to show wear and tear, I’m not keen on them looking like junkyard dogs”
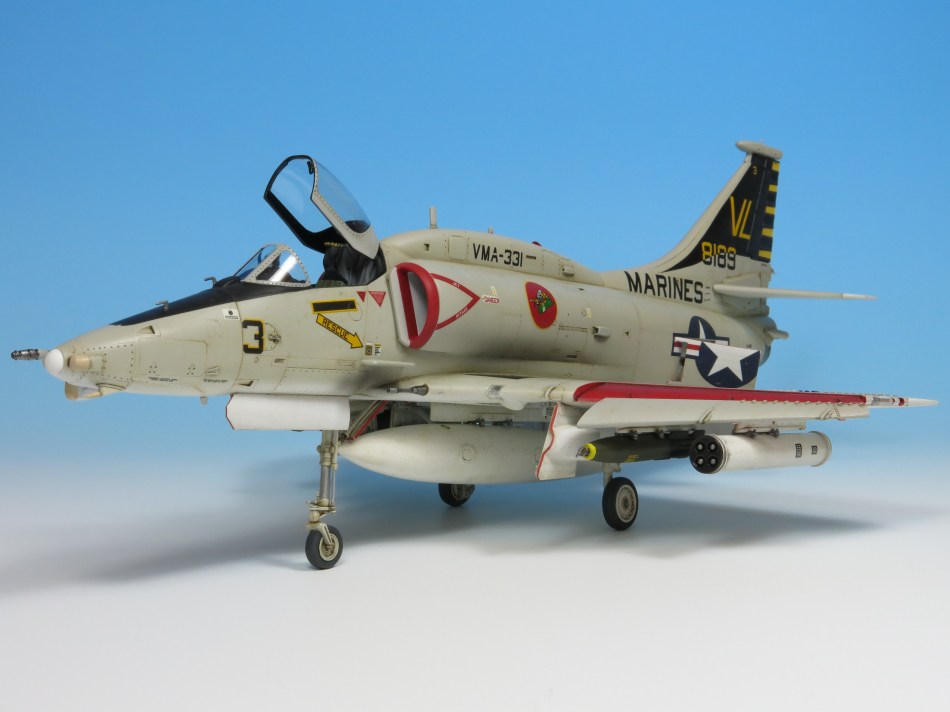
As mentioned earlier, this model was painted entirely in enamels, or more specifically, Humbrol’s newly formulated enamels. Over the years this famous brand has suffered at the hands of poor quality control, erratic colour matches and protracted drying times, so much so that many modellers simply refused to use them. Humbrol, now in the ownership of Hornby, decided that enough was enough and brought their production back into the UK, the results being a huge upswing in quality. Keen to see whether this was so, I took a trip to my local Hobbycraft and bought the colours I needed for this model, Satin White, Satin Gull Grey, Matt Black, Gloss Yellow and a couple of other greens that I needed for the weapons. Each of the colours was sprayed onto the model using my Iwata HP-CH airbrush, the paint being thinned with Humbrol’s Enamel Thinner. Right from the off I could see that these paints were entirely different from those that I had used before. Thinned down, the paint atomised evenly to produce a smooth finish that could be built up in layers to create a pleasingly opaque colour. Once dry – overnight in this case – the surface could be gently buffed using 3600 grit Micromesh to produce a super-smooth finish: I was, to put it mildly, very impressed.

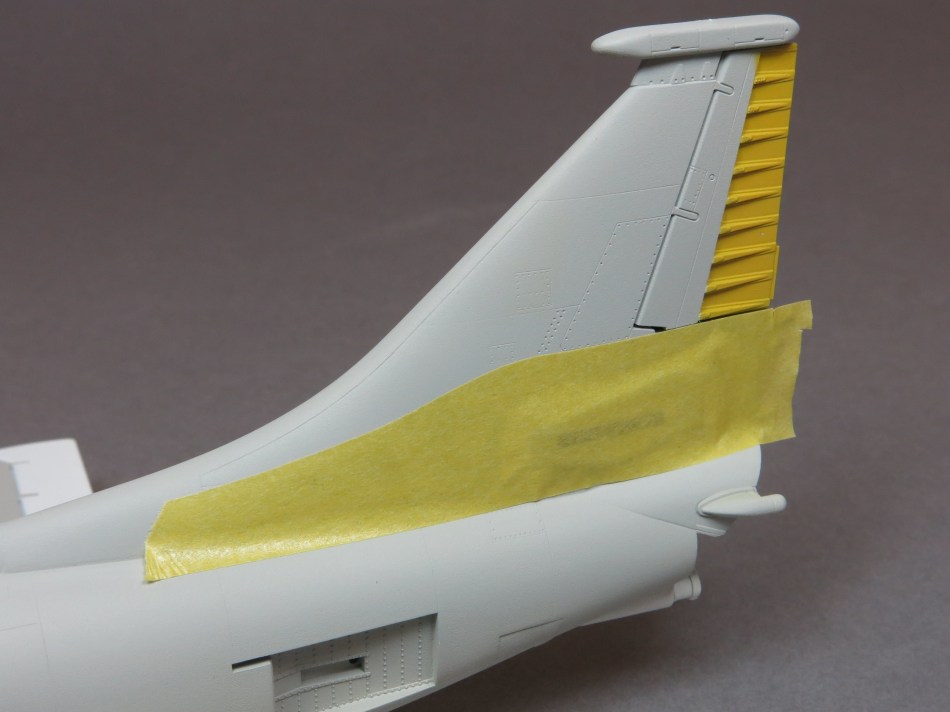
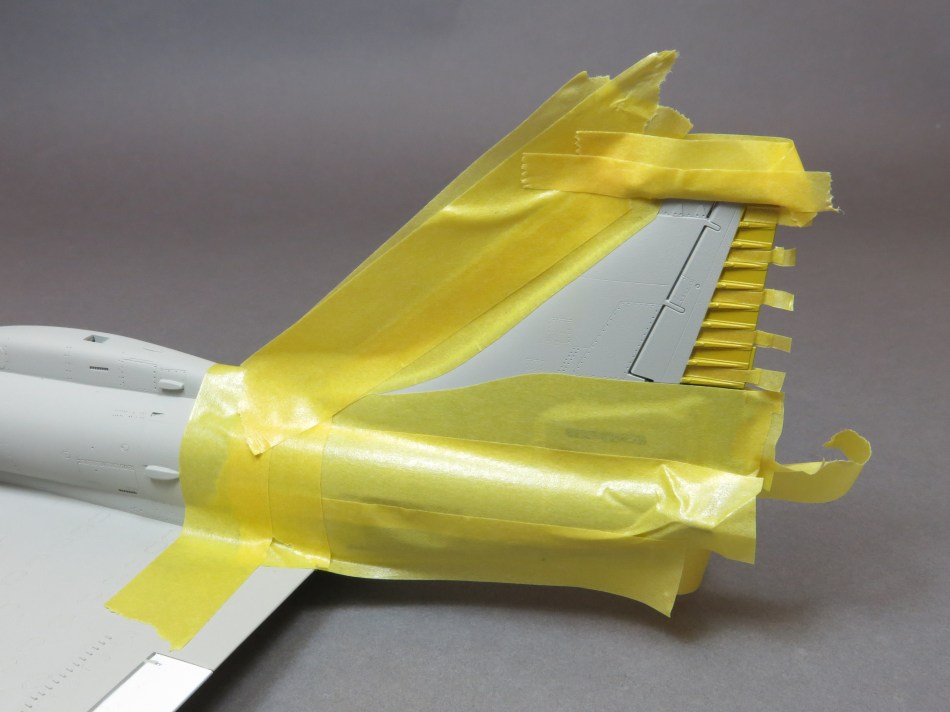
Happy that the white and grey were dry, the thorny issue of the tail markings could be addressed. As with many of their kits, Hasegawa provide options to create the marking on the tail: either use one decal that has all of the markings in place, or use the individual letters and numerals and paint the larger sections, in this case that distinctive black flash. I chose the latter. Here’s how I did it…

Coloured tails are often fairly easy to mask and paint so long as you have some high quality masking tape – in this case Tamiya’s – a scalpel and some accurate drawings that show you exactly where the demarcations are. In this case, the shape of the black panel and the need to align numbers along it’s bottom edge that were black and yellow, meant that the masking needed to be extremely accurate, if everything was going to line up. The way this was accomplished here was to lay a piece of 15mm masking tape over the decals sheet and then using brand-new No.10A scalpel blade, trace the outline of the lower edge of the marking, pencil marks then being applied to the tape to act as guides to its location on the model. This process was then repeated for the leading edge of the black panel, again, care being taken to ensure that the masking tape was cut as accurately as possible.


These pieces of tape were now laid onto sheets of plasticard and the fin masked-off with more tape and sprayed yellow, this being the accent colour in-between the ribs on the rudder. Once dry, more tape was laid over the yellow marking on the decals sheet, each being cut out individually and then placed on the model in order. The larger masks could now be applied to the fin, constantly checking their location so that they were placed in exactly the right place. The fin could now be sprayed with black and the model set aside to dry, before removing the tape to reveal the completed, black and yellow marking.

With the paintwork dry, my Skyhawk was oversprayed with several layers of Alclad Aqua Gloss in readiness for the decals. This is always my favourite step in the completion of a model, but it can sometimes throw up obstacles that can make it more frustrating than it needs to be. Over the years, I’ve read numerous articles stating that Hasegawa decals are too thick and unusable which is simply not true: apply them using Gunze Sangyo Mr Mark Setting and Softer solutions and I guarantee that they will look every bit as good as those from the aftermarket.

That said, they can suffer in the colour department, white often-looking more like creamy-grey, than a pure colour. In this case, the decals certainly fell into that category and so I replaced the star and bar markings with those found in Hasegawa’s TA-4J kit, which were a much cleaner white colour that matched the rest of the white paint used on the model. The rest of the decals came from the kit sheet. After allowing the decals to dry out, the model was washed in warm soapy water, left to dry and then oversprayed with several thin layers of matt varnish to seal everything in.
Weathering a model is all a matter of personal taste and though I like my models to show wear and tear, I’m not keen on them looking like junkyard dogs. In this case and in keeping with my ‘old school’ ethos, the panel lines were ‘washed’ with mixture of Windsor & Newton Raw Umber oil paint and Humbrol German Grey enamel. This was used both neat and thinned into a delicate wash that could be applied to the panel lines and around the finer details, any excess being removed with either a soft, flat brush, cotton buds, or a cotton cloth dampened with Rowney’s Odourless Turpentine.
Next Time…
…We’ll completed this impressive little kit. See you then!
Follow this Blog!
Don’t forget that if you like what you see, please subscribe to this page to get regular updates from The Kit Box.
Here’s the link to show you how!
https://thekitbox.wordpress.com/2017/03/03/follow-this-blog-2/

Nice looking kit. I always like the Scooter. Did you cut the codes and number off the sheet to use on the painted tail section?
LikeLike
Just brilliant!
LikeLike
Great looking build and a nice how-to on masking.
I read that you used Aqua Gloss as clearcoat.
I’ve tried this too, but am struggling with getting an even layer with my H&S Evolution. It’s either too much and the clear starts to puddle or not enough and I get a slightly rough finish (which is however easily dealt with using some micromesh clothes)… Still looking to hit the sweet spot…
LikeLike