
“This type of kit really is a palate cleanser and helps to break the line between complex builds, with parts that take little time to assemble and paint, before the display case can be opened once more”
Yesterday, both on here and on my YouTube channel, I discussed the need every so often to tackle something that pushes my skills and offers a build that is a challenge, both in terms of construction and detailing. Most modellers who have been in the hobby for some time will similarly look to extend their skill set with more complex undertakings, so I’m certainly no different in peeping through that particular window of opportunity. Equally though, it is fun to turn the clock back to more innocent times in our lives and build something just for the sheer hell of it. An easy kit that doesn’t push you one iota. One that can be assembled in minutes and then painted in only few hours. Tamiya’s aircraft kits are just such kits, packages that are as easy as it gets to complete, with a bare minimum of parts, perfect fit and little or no extraneous features to cloud the process.
I love them!
Having built the MENG P-51D, I decided at the last minute to have a go at Tamiya’s offering, a kit that I built twenty years ago in ‘Red Tail’ markings, but today I no longer have. I remembered that it was as simple as it gets and was keen to see if it was all that I remembered. You can therefore imagine my pleasure when a trip to my local model club turned up an F-51D kit that was being sold by one of the members. Money handed over, I set about deciding on what to do with this older, simpler box of bits and pieces.
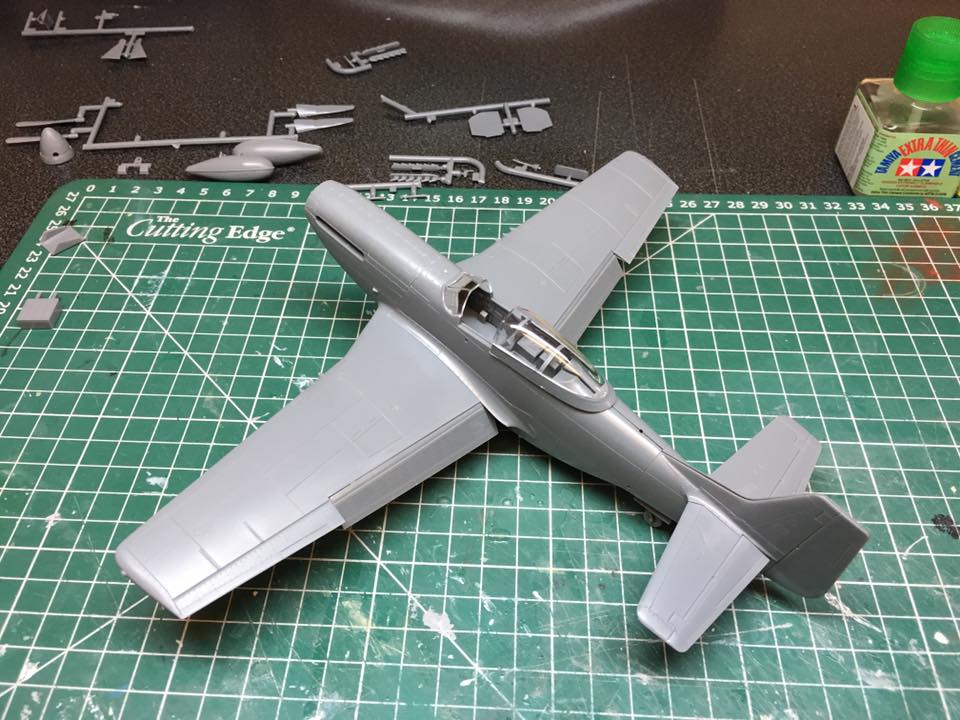
Tamiya’s Mustang is no MENG kit, but the basics are certainly there and the levels of detail, though simplified, are more than acceptable. Having decided that this would be an ‘out of the box’ build, I was happy to simply add seat straps and then paint it in a cool scheme, a modern ‘warbird’ being selected as something suitably different. Though the kit had fallen by the wayside in terms of finer details, it most certainly had not in terms of design and the way that the parts allowed much of the package to be joined without glue. The image that you see here shows how it is possible to have the model on its wheels, almost complete without having to apply glue, which certainly bears testament to the quality of its design.
But it’s the simplicity of the kit that really makes it enjoyable to build. With little over 50 parts, the contents of the box are never really going to tax anyone and that was certainly the case yesterday. All of the sub-assembly work and initial clean up was carried out in less than an hour and that included dealing with seam lines and joints around the wings! It was nothing more than an exercise in the careful removal of the individual pieces from their runners and then the application of glue. It really could not have been easier! Beginners most definitely need apply…

This type of kit really is a palate cleanser and helps to break the line between complex builds, with parts that take little time to assemble and paint, before the glass case can be opened once more to display the results. Though I would suggest that no-one does it better than Tamiya, there is an argument that Eduard offer similar products, which though slightly more complex in approach are just as easy to build and paint in short order. Just look at their delightful 1:72 Spitfire and Fw190 and their 1:48 Spitfire and Me109G, to give you some idea of what to expect. Easy to build, look great once complete and far from expensive, they have much to recommend them, which is why they are so popular!
So, my P-51 is ready to paint and I will soon have another model to add to the collection. It was every bit as easy to build as I remember it to be and now I have a canvass onto which I can apply what I hope will be an interesting finish. I might not be successful in what I have planned for this project, but at least I am now halfway there and in only using one hour so far to build it, it’s not as though if it does all go belly-up, I’ve wasted much in the way of precious time along the way. What’s not to like?!
Now, where did I put that chrome paint..?

Exactly – that’s what I’m doing at the moment, had a nightmare with a couple of kits in a row, so started building the Tamiya He219 for the same reason – just knew it would fit, not be a hassle and would look nice at the end.
LikeLike
Spence, is your example the one with the two-piece sliding canopy, or the later edition that included a single piece canopy as a refinement?
LikeLike
It’s the original issue kit with two-part canopy. I think I’ll replace mine with the spare from the MENG kit…
LikeLike
Good move! It was the only element of building that kit that I didn’t enjoy, and the only thing that spoils the finished model.
LikeLike