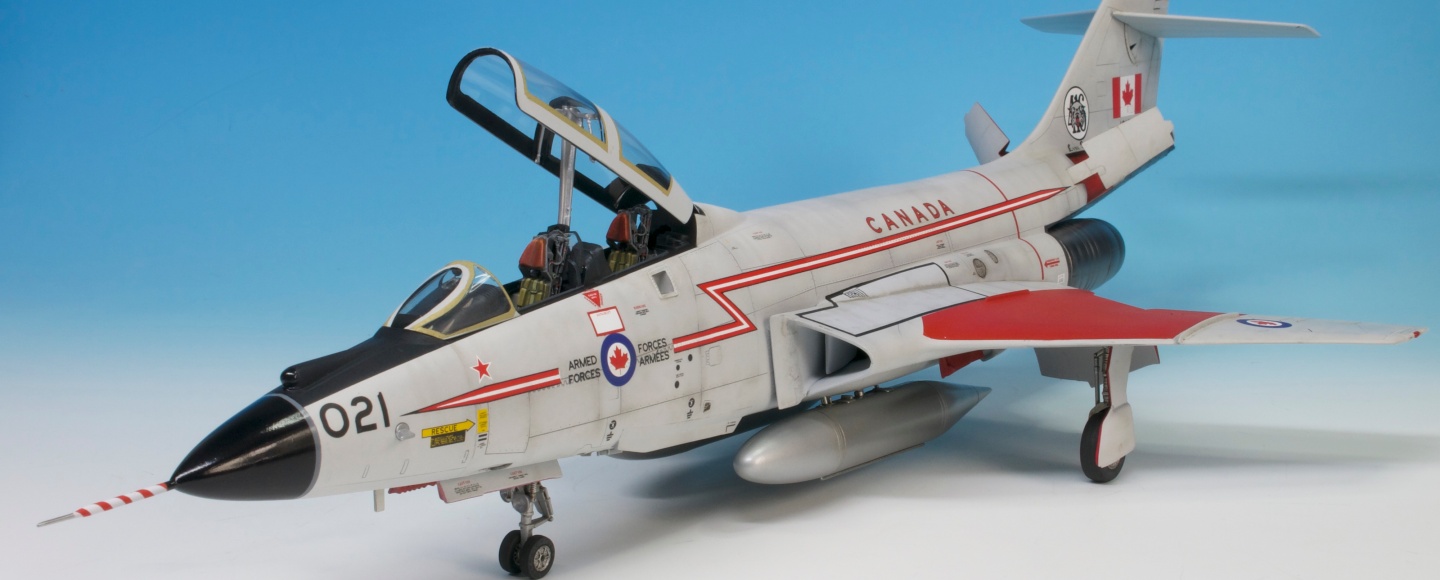
Anyone that has built any of these old Monogram kits, will be aware of their raised surface detail and that if you tackle one, you may have to replace one or two panel lines during construction and then the subsequent clean-up of seams and joints.
Over the last few months I’ve turned my attention from all things Tamiya, to all things Monogram, an armoured Legacy Collection, being replaced by a Legacy Collection that not only features machines with wings, but one that deals specifically with Century Jets, in all of their glory.
Anyone that has built any of these old Monogram kits, will be aware of their raised surface detail and that if you tackle one, you may have to replace one or two panel lines during construction and then the subsequent clean-up of seams and joints. Created at a time when such luxurious frivolities as incised details were a mere glint in a Monogram designer’s eye, modellers in 2022 who choose to build these kits are faced with either the ordeal of a full rescribe, or a few steps that work with the panel lines, to create a neat looking model with a complete set of details still in situ.
Being a lazy sort(!) I wanted to treat this series very much as a collection of builds that maintained the spirit of those initial releases, constructing them as they were intended and thus working with the surface detail, rather than removing it and starting again. That meant that I had in places (lots of places, as it turned out!) I had to reinstate the lines so that any removal through clean-up looks as seamless as possible, all puns intended!
This little video shows you how that has been achieved over the last two builds, the F-101 and the F-106. It’s simple, needs few tools and actually only a modicum of skill to carry out. If I can do it, anyone can! I hope that you enjoy the video and that it helps you to build these models cleanly should you decide to take the plunge and have a go at one of Monogram’s kits.
See you next time!
Before I Go!
If you have enjoyed seeing this update and reading my thoughts, please subscribe to this page and perhaps take some time to scroll through its contents – you can even leave comments under each update! It really will help me out and allow me more opportunity to grow its contents and continue with my work within the hobby and industry! If you REALLY like it, consider sharing it with your friends – the more people that see it, the more fun we will have! Thanks a lot!


Always good to see a simple way to avoid heavy drinking while modeling….. 🙂
LikeLike
Hi Spencer,
Unfortunately, I couldn’t see a thing on the video! The light was so bright that even your pencil lines didn’t show up. Just thought I should let you know, in case you hadn’t realised. I would like to see it again if you get a chance to re-do the video.
Cheers,
Andy
LikeLike
That’s odd. I’m watching it now on both my iPhone 13 (which was used to film it…) and my iMac and I can see everything perfectly clearly, including all of the detail, the panel lines and those pencil lines. The lighting is perfect. What are you watching it on, may I ask?
LikeLike
Hi again Spencer,
I’m on my IPad, and everything is really bright., even your fingers! No problem on anything else, on your blog, or anywhere else though. It’s a bit odd then if it’s only me not seeing properly, I suppose wait to see if anyone else has an issue. Weird!
Andy
LikeLike
I’ve just asked my partners at the Interesting Modelling Co page to check it and they can also see everything clearly and they can. Again, I’m looking at it now in playback and it’s as I recorded it – I wouldn’t have posted it if it was degraded and the detail couldn’t be seen. Perhaps your iPad settings are off as we can see everything as it was recorded. In fact, videos taken this way can’t really be over-exposed because they deal with all of the metering automatically, this one being captured in 4K and then just resized for the website. I’m really not sure why your playback is so off! Sorry!
LikeLike
Hi Spencer,
My son air dropped the video to his phone ( same as yours) and it was fine. Perhaps it is because I am so far behind the times ( old IPad 4 mini) I will just have to wait until one of my sons upgrade to the latest model, and hopefully pass down what they’re using now to me! Apparently, so my son tells me ( I haven’t got a clue) it’s because the video is HDR, so it’s my fault that I can’t see it in the way it should be seen!
Cheers,
Andy
Ps. Spitfire book arrived safely, and I am looking forward to reading it.
LikeLike
Andy, I am watching on my iPad 4 mini and am seeing the same as you – whited out drop tank making it impossible to see the seam.
On my iPhone it is quite watchable so it must be something about the iPad mini rendering engine.
LikeLike
Oh yeah, going to be trying this out for sure.
Cheers
Collin
LikeLike
I’ve done something similar that we called “scribing”. So instead of cutting the plastic with the sharp side of the tip I turned the blade over to the flat side of the tip and, in essence, removed the plastic rather than displacing it. Great tip and I am not having any issues with seeing the video.
LikeLike
Yeah, scribing would be used to repair any incised panel lines (or completely replace the raised lines as mentioned in the text) but I would use a dedicated scribing tool to carry out that work! I’m pleased that you can see the video!
LikeLike
Nice one, saves a lot of time rescribing.
LikeLike
Thanks Spence, simple but effective.
LikeLike
Mr. Pollard: I feel a little deceived; I was expecting an article on how to REPLACE raised panel lines (whatever they are) with stretched sprue, etc. In my many years of model building, I can only remember having to “REPLACE” a raised panel line was when I was working with applying an oversized battle damage patch or restoring a weld line on a piece of armor. But now that I think about it, my pompous ass is telling me that we are REPLACING (exchanging, removing or correcting) a raised panel line with an accurate panel line. Never mind … Please supersede, supplant, or displace my comments. Cheers.
LikeLike
Nice tip! I am going to have to pull something out of the stash and experiment…
LikeLike
Thanks! Looking at building my Monogram Century Series in a new light
LikeLike
Very good technique, for most panel lines fuel tanks are generally welded together and have protruding weld seams.
LikeLike
Thanks so much for this video! I have always wondered how one reinstates raised panel lines!
LikeLike
Hi Spencer,
I really enjoy your modelling since Mis, etc. I am glad I found your blog as I am also working through a series of Monogram Century fighters. Just completed the 48th Hun. I wanted to subscribe to your feed but some how the link did not work. Maybe you can help
Regards
Tony
LikeLike
What an excellent idea, breathes new life into my Monogram B17… I, d hate the thought of trying to rescribe it
LikeLike